SHIFTING ROOTS

home, garden, food, and prairie lifestyle

  • About
    • Contact
    • Work With Me
    • Features
    • Privacy Policy
  • Blog
  • Gardening
    • How to Start a Garden: Especially if you’re in Zone 3 or Zone 2
    • Seed Starting
    • Vegetable Gardening
    • Perennials
    • Cut Flowers
    • Small Space Gardening
  • Recipes
    • Canning
    • Preserving
    • Prairie Fruits Cookbook
    • The Best Pumpkin Recipes
    • How to Make a Tempting Christmas Cookie Tray (Plus Recipes!)
  • Popular Posts
  • E-Books
    • Pretty & Practical Garden Planner
    • Cut Flowers Made Simple
    • Constant Colour Perennial Garden
    • Small Garden, Big Harvest
    • Growing Roots Online Gardening Course
    • Frost Proof Flower Garden
    • Bouquets Made Beautiful
    • Savvy Seed Saving Annual Cut flowers
    • Prairie Fruits Cookbook
    • Online Gardening Consultations
  • Seasons
    • Christmas

15 Clever Solutions to Make the Most of a Character Home

February 23, 2018

Pin345
Share1
Tweet
346 Shares

Let’s do a little house math.  Take one previously unloved 1920’s character home, add one part innovation and one part hard work and what do you get?  An amazingly stylish and functional family home.

This post is the second part in a series about my friends Jacqueline and Marc and their beautifully renovated 2 story 1920’s character home.  If you haven’t taken the tour, I highly encourage you to take a few minutes and hop on over to the last post.  Don’t worry, we’ll wait.

Last post was all about enjoying renovation eye candy.  Today’s post is all about the tricks and clever renovation decisions Jacqueline and Marc made to make their house work for them.

Let’s start with the biggest challenge, the kitchen.

Solutions for a Small, Dated Kitchen

As any home owner of a home previous to the 1960’s knows, kitchens in old homes do not have the same space as modern homes do!  Jacqueline and Marc decided to open half of the wall between the kitchen and dining room, and create a peninsula in it’s place.

Unfortunately, opening a wall in an old home is like opening Pandora’s Box.

There was one big problem. . . they lost the space for their fridge.  (More about that later.)  The other problem?  The support beam had to stay.

Embrace what you can’t change! We couldn’t inset the support beam into the floor joists, so I thought we’d just make an interesting design element out of it by cladding it in the same reclaimed wood as the wrap around bar.

-Jacqueline

(Spoiler alert: one big problem actually turns into about 5 unexpected problems. . . anyway.)

Renovating an old home? Come see how one big problem turns into 5 big problems, and the creative solutions to each of them.Click To Tweet

As for the fridge, the only solution was to give up the closet by the stairs and put the fridge inside.

Tucking it into the foyer closet was a great solution. While this was absolutely motivated by function, I am so happy with how it played out from a design perspective – who wants to look at the giant body of a fridge, anyway?

-Jacqueline

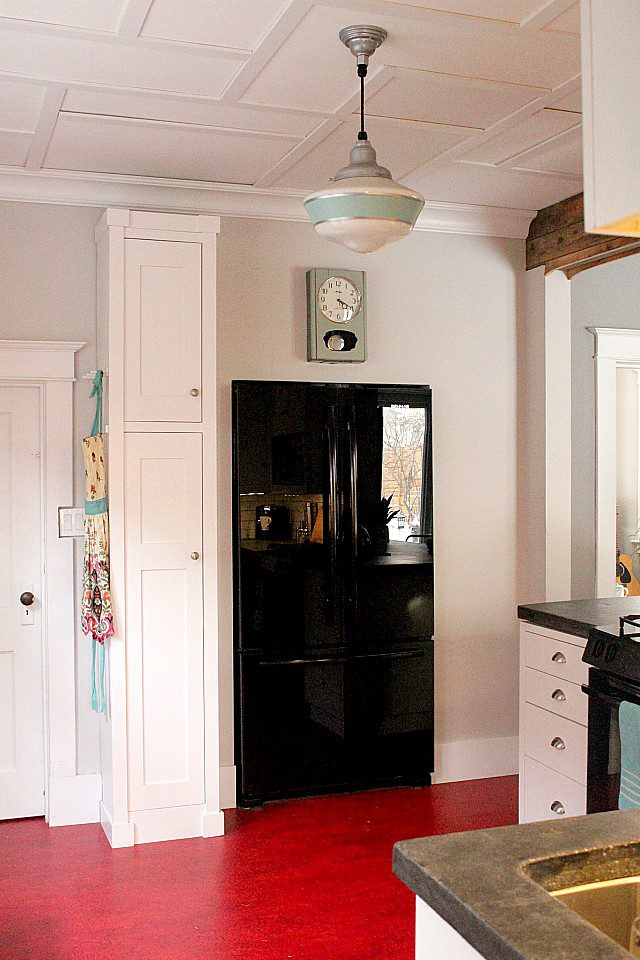
Originally there was also supposed to be a pantry inset beside the fridge.  However, when they tore into the wall, they discovered that all of the electric and plumbing ran behind it.  Moving it would have been way too expensive.  Rhine Artisans suggested this column solution to match the kitchen cabinets, and the rest is history.

I’m no stranger to kitchen tetris.  Here’s how it played out in my kitchen.

Creative Solutions for Uneven Ceilings

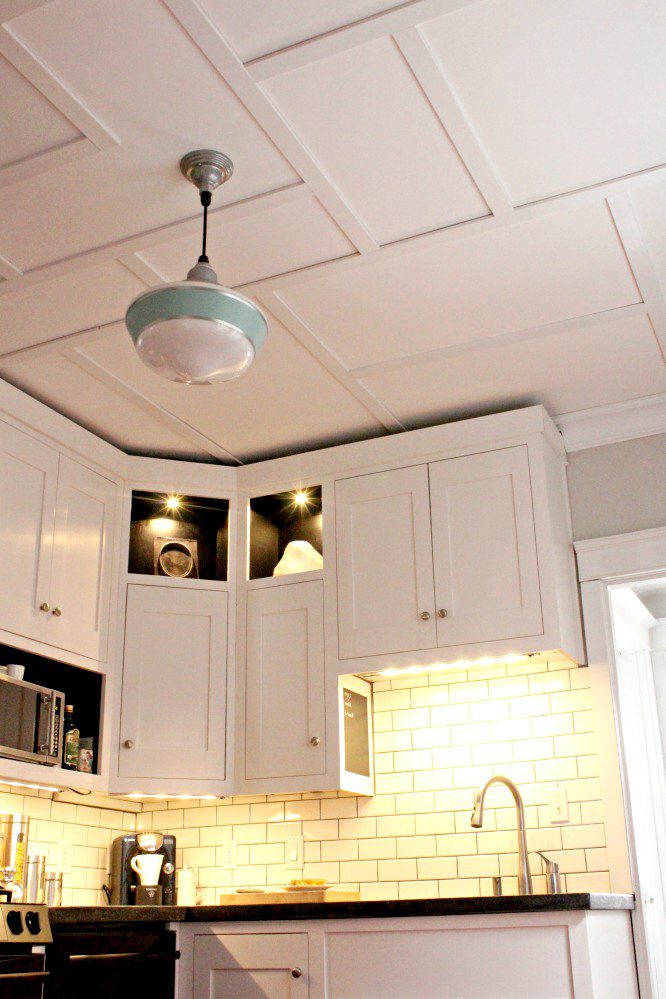
Don’t you love the ceiling?  It’s not only a beautiful and unique design choice, it serves an important function as well.

We didn’t tape and drywall the kitchen ceiling when we gutted, reinsulated and redid the rest of the ceilings on the main floor as it was expensive with all the shimming required to deal with the uneven floor joists (I was inflexible on this: textured ceiling was NOT an option in my plans!). Our initial plans for the kitchen were to do a tin ceiling. Later, in order to reduce expense and satisfy my design inclinations, we got creative with trim “a la Piet Mondrian”. This both covered the drywall seams and accommodated an easy-access panel to the under-floor plumbing for the upstairs bathroom.

-Jacqueline

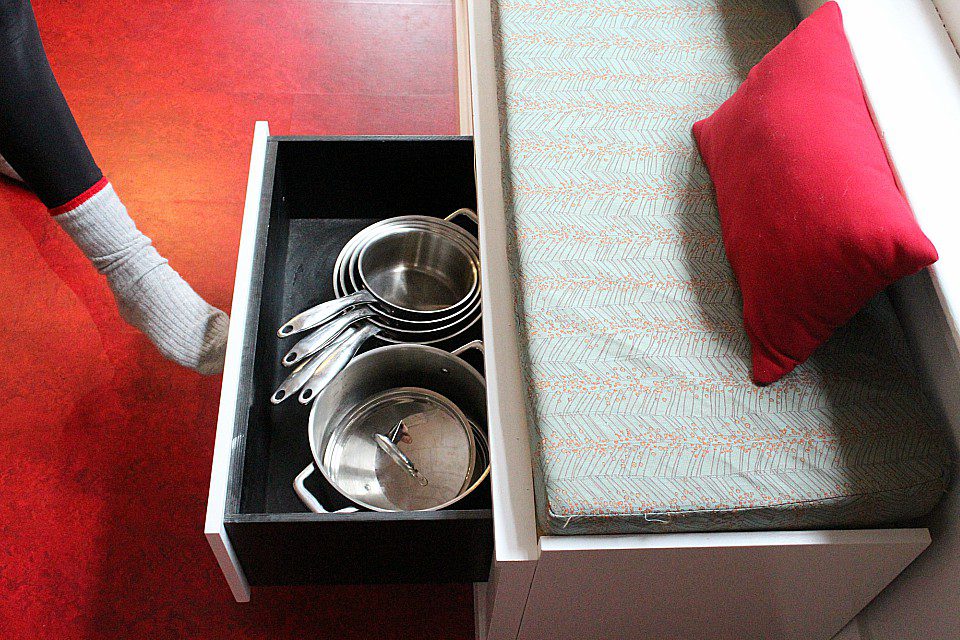
Another problem that arose with tearing out the wall was that they lost a lot of cabinet space–a precious commodity in an old home!  The only space available was under the window.  However, they couldn’t build anything to cabinet height because the window went too low.  The solution?  A custom bench with kick drawers from Rhine Artisans.

Custom Cabinets for Tall Homeowners

Jacqueline is 5’10” and Marc is 6’5″ so they designed all the kitchen cabinets to be 2-3 inches taller than standard.  No more sore backs from chopping vegetables!

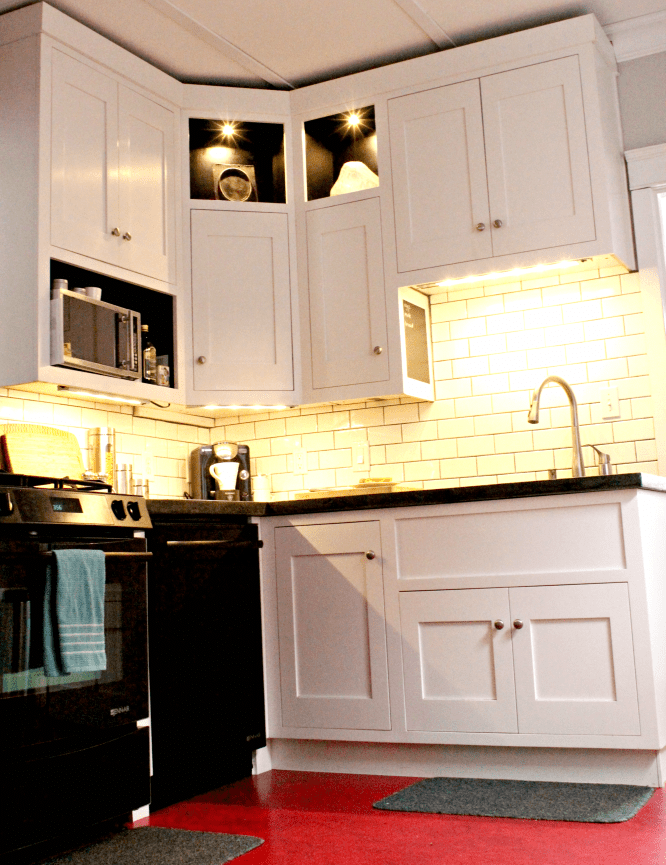
Another problem that came from opening up the wall was that there was no place to put a vent hood. . . except the one spot they were trying to open up in the first place.  The solution?  A JennAir downdraft gas range.  Everything vents down into the basement and out the side of the house, instead of through the ceiling.  I’m filing this information away for when we redo our kitchen.

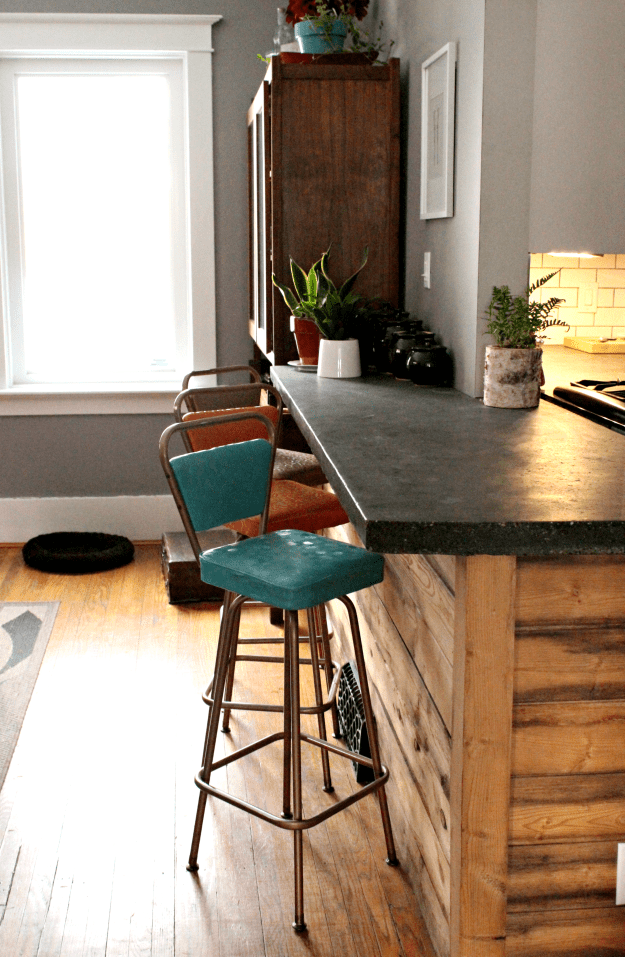
Consider Concrete Countertops

One thing I love about Jacqueline and Marc’s house is the use of concrete countertops throughout.  They’re more durable than wood, cheaper than stone, and just as beautiful.

Here’s what Jacqueline has to say about their experience with concrete countertops:

We also poured the dark concrete counters ourselves, and as I wanted matte finishes throughout, apoxy sealant wasn’t an option, so we went with a food safe stone sealant. Only drawback is you have to reapply every couple of years. Further, as the concrete is pourous, I generally prep food on boards and am quick to wipe up any oil or red wine spills!

Out with Plastered Ceilings, In with Insulation

Most of the ceilings on the main floor were gutted and replaced with drywall.  The homeowners chose to insulate with Roxul.  It’s fire proof, rodent resistant, and very sound proof–an important consideration for two musicians with sleeping children upstairs!!

There’s also a special added bonus. . . the chance to get rid of popcorn ceilings! #downwithpopcornceilings #justsayno

After my renovation experiences, I’m not a fan of plaster anymore either.  Here’s some of my frustrations.

What You Should Know If You Want To Install Dark Wallpaper

Have you ever tried to wallpaper plaster walls?  If you haven’t. . . save yourself the hassle and seriously consider hiring a professional.  I tried wallpapering my son’s room once and it was impossible to line up everything correctly.

Here’s what Jacqueline has to say about her dark wallpaper:

Choosing a dark colour with a slight sheen for the top half of a stairwell in an old house with plaster walls was probably not the smartest from an ease of installation viewpoint (it also highlights uneven surfaces and plaster cracks), but darn it, it still looks gorgeous! I just might choose a lighter colour next time… And I still haven’t gotten around to chalking those seams…another job for the homeowner’s neverending list?

Let’s go downstairs for a moment and take a look at how the homeowners made the most of their basement.

Love wallpaper?  Read about my experiences scraping it off if you need a laugh.

The Best Solution to Save Height in a Basement Ceiling

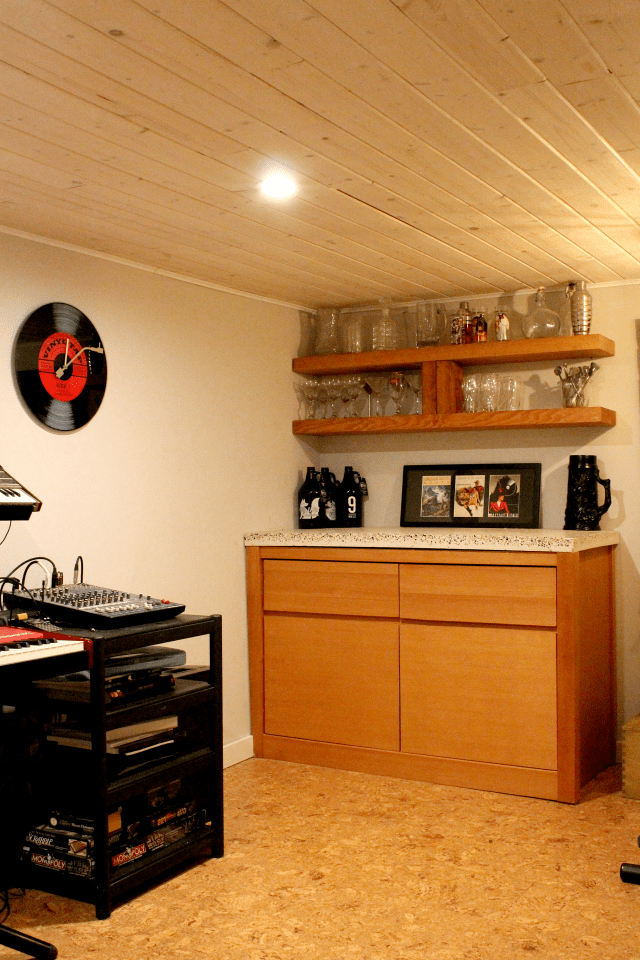
Basements in old homes are often short on height.  With two tall owners, every possible inch needed to be saved.  I’m going to hand this over to Jacqueline again to explain her and Marc’s thought process.

A drop ceiling would have meant we lost too much height (plus, they’re ugly)… A finished flat ceiling would have been costly with the uneven floor joists (just like upstairs), particularly as it is a job we would have had to hire out… Flexible tongue and groove wood allowed us to tackle design, cost and function with one stone. Whitewashing the pine allowed me to retain the wood grain while avoiding a darker stain that would make the ceilings of the already short 7ft basement feel even shorter…And clear-coating wasn’t an option as I loathe the yellow colour of pine… We insulated the ceiling with Roxul and spray foamed the walls.

Uneven basement floors also threatened to take away from the basement ceiling height.  The homeowners installed a custom support lattice of treated wood to address the unevenness and retain as much ceiling height as possible.  Cork flooring was flexible enough for variation on the square, and is also warm on the feet and pleasing to the eyes.

Love Character Homes?  Be sure to check out the tour of Jacqueline and Marc’s home, as well as this gorgeous warm character home.

Awkward Bulkheads

Despite the amount of ceiling height Jacqueline and Marc were able to save, they couldn’t retain enough height under the bulkheads to be useable for either of them.  Thankfully, the bulkheads were close to the laundry hook ups, so they framed a laundry room and installed closets directly under the bulkheads.

Two clever solutions for saving ceiling height in your basement, and what to do under a bulkhead.Click To Tweet

A Little Something for the Kids

The spot underneath the staircase is often a missed design opportunity.  Not in this home!  The homeowners used leftover pine from the ceiling to finish the back wall and painted the side wall with chalkboard paint.  The resulting space is perfect for toy storage, playing, or hiding away from the grown-ups.

I’d like to sincerely thank Jacqueline and Marc for letting me photograph and write about their home.  It’s been exciting collaborating with them!

What’s your favourite design solution?  Have you ever lived in an old home and had to work around something?  I’d love to hear about it in the comments.

SaveSave

SaveSave

Kristen Raney

Kristen is a former farm kid turned urban gardener who owns the popular gardening website, Shifting Roots.  She is obsessed with growing flowers and pushing the limits of what can be grown in her zone 3b garden.  She also loves to grow tomatoes, but oddly enough, dislikes eating them raw.

Leave a Comment
Filed Under: Makeover, Renovation Tagged: character home, creative home, design solutions, home renovation, home tour, tips and tricks

About Kristen Raney

Kristen is a former farm kid turned urban gardener who owns the popular gardening website, Shifting Roots.  She is obsessed with growing flowers and pushing the limits of what can be grown in her zone 3b garden.  She also loves to grow tomatoes, but oddly enough, dislikes eating them raw.

Leave a Reply Cancel reply

Your email address will not be published. Required fields are marked *

This site uses Akismet to reduce spam. Learn how your comment data is processed.

Grow roots with us

  • Email
  • Facebook
  • Instagram
  • Pinterest
  • Twitter
  • YouTube

Welcome!

Hi, I'm Kristen and I help new gardeners learn to grow their own vegetables and beautify their yards. I also share recipes that use all that delicious garden produce. Grab a coffee (and your gardening gloves) and join me for gardening tips, simple recipes, and the occasional DIY, all from the lovely city of Saskatoon, Saskatchewan.

P.S. First time gardener? You'll want to download the quick start gardening guide below!

Recent Posts

  • 5 Easy Ways to Increase Pollination in Your Vegetable Garden
  • Bloom Times: What Cut Flowers Grow When in Zone 3
  • The Best Vegetables & Flowers to Start with Winter Sowing
  • 21 Cut Flowers to Grow in Part Shade
  • The Best Grow Lights for Seedlings (from Budget to Bougie)

Welcome!

Hi, I’m Kristen and I help new gardeners learn to grow their own vegetables and beautify their yards. I also share recipes that use all that delicious garden produce. Grab a coffee (and your gardening gloves) and join me for gardening tips, simple recipes, and the occasional DIY, all from the lovely city of Saskatoon, Saskatchewan.

Connect with Shifting Roots On. . .

  • Email
  • Facebook
  • Instagram
  • Pinterest
  • Twitter

Find What You’re Looking For. . .

Privacy Policy

I love seeing the world through this loving boy’ I love seeing the world through this loving boy’s eyes.  Honestly, I’ve been so sick that I wasn’t really in the mood to “do Valentines Day” but there was this sweet little voice going on about how excited he was for today and how much he loves his family and I just couldn’t resist.  So whether you’re on your own, part of a couple, or in the thick of life-with-littles craziness, Happy Valentines Day!

#valentinesday2020 #mylittlevalentine #boymomlife #lifewithlittles
How do you pass a cold -28 day? By planning your How do you pass a cold -28 day?  By planning your garden, of course!  Today in my stories I’ll be going through the steps I take to start planning everything out.  I’m curious, do you start planning now or wait until the last minute?

P.S.  want your own copy of this planner?  This is the newly updated paid version and it’s on sale by itself from now until Sunday for only $5.  If you’re from Canada, use the code CANADA to make $5 USD be closer to $5 CAD.  Head over to the link in my bio to get yours.

#gardenplanning #gardenplanner #gardenersofinstagram #gardenersofig #organizedlife #organizedliving #wintergardening
Curious about growing lettuce indoors? My experim Curious about growing lettuce indoors?  My experiment is a success so far, although it’s still going to be awhile before I’m eating another salad off of them.

Okay, so maybe a little rant today.  I think sometimes in the gardening space we’re guilty of making things seem easier than they are.  Myself included.  This lettuce project is a case in point.

Was it easy?  Yes.  But will it provide me with endless salads all winter long? Nope.  Or at least not at this scale.  I’m going to estimate that I’d need at least 15 plants this size, especially since it’s winter and everything just grows slower.  And I’m the only person in my family who really eats salad.

In conclusion, this is a fun project to pass the winter, and not a truly sustainable source of lettuce.

Thoughts?

#growinglettuce #eatwhatyougrow #growwhatyoueat #wintergardening #indoorgardening #plantproject #sustainablefood #gardenersofinstagram #gardenerslife #northerngardening
Part of the mystery of seed starting is knowing ex Part of the mystery of seed starting is knowing exactly what to start when.  Every two weeks, I'll be posting these handy guides so you have enough time to order your seeds and be ready to plant when it's time for your area.  To find out when these veggies, herbs, and flowers need to be started where you live. . . ⁠
⁠
1. Search out your area's last frost date.  There are plenty of calculators on the Internet.⁠
⁠
2. Count backwards 8 weeks from that date.⁠
⁠
3. Start these seeds when that date hits.⁠
⁠
If you follow me because we're in similar zones--don't panic, it's not time yet!! I won't be starting my 10 week seeds for another two weeks, and even that is slightly on the early side. (I'm starting everything a bit early so I can hopefully plant it out before baby gets here--I won't be physically able to do it after.) I like posting the info early for followers in warmer zones and so you can save it and still have time to order/buy seeds & supplies.⁠
⁠
Which one of these are you most excited to start?⁠
⁠
#seedstarting #seedlings #homegardener #northerngardener #homesteading #urbandhomesteading #homesteadingskills #gardenlife #gardenlifestyle #startingseeds
Eeeek!!! My luffa seedlings are up!! I’m growing Eeeek!!! My luffa seedlings are up!! I’m growing the whole seed packet in hopes that a few of these little luffa babies will provide me with zero waste sponges that I can use for home cleaning, and as an exfoliant in home made beauty products.

The catch?

These plants are notoriously hard to grow, especially when you live somewhere cold with a really cold growing season—and if they get a hint of frost on them they turn to mush and all my hard work is ruined.

Gulp.

But gardeners are born optimists, so I’m giving it a shot—because you miss 100% of the shots you don’t take.

P.S. if you’re trying luffa in zone 3 like me, just basically ignore all the directions on the seed packet.  Start them immediately (two weeks ago would have been ideal) and follow along because I’ll show you exactly what to do and when.  I’ll be popping these under a grow light once the sun goes down.

#luffagourd #luffa #loofah #seedlings #seedstarting #northerngardening #northerngardener #gardenersofinstagram #gardenersofig #mygardenthismonth #gardenlife #canadiangardening
This weekend I took a big leap of faith. I came t This weekend I took a big leap of faith.  I came to New York to meet with other content creators/business owners to dig deep into what we do and create a strategy around our messaging.  I don’t even know how to properly describe what all went down, but is was incredibly life changing and I really feel connected to this tribe of women who are committed to playing to win and being the people our businesses need us to be.  I’m so excited to share what I’ve planned for my business with you in the coming months.

#playtowin #gardenblogger #businessowner #wahmlife
Is there such a thing as a no-fail houseplant? I Is there such a thing as a no-fail houseplant?  I think the Sansevera or Snake Plant or Mother-in-law’s tongue comes close.  Sure, it might be the vanilla of the plant-loving world, but it is so good for so many situations!⁠
⁠
It can handle you forgetting to water it, low light, or bright light.  It is somewhat forgiving if you are an over-waterer. ⁠
⁠
I’ve had this one for 2 or 3 years now and I keep getting rewarded with more spikes.⁠
⁠
Plant lovers, is there another houseplant you think would be perfect for beginners?⁠
⁠
#crazyplantlady #houseplantsofig #houseplantsofinstagram #snakeplant #houseplantlove
Load More… Follow on Instagram

Theme Design By Studio Mommy · Copyright © 2021

Copyright © 2021 · Beyond Madison Theme on Genesis Framework · WordPress · Log in