SHIFTING ROOTS

home, garden, food, and prairie lifestyle

  • About
    • Contact
    • Work With Me
    • Features
    • Privacy Policy
  • Blog
  • Gardening
    • How to Start a Garden: Especially if you’re in Zone 3 or Zone 2
    • Seed Starting
    • Vegetable Gardening
    • Perennials
    • Cut Flowers
    • Small Space Gardening
  • Recipes
    • Canning
    • Preserving
    • Prairie Fruits Cookbook
    • The Best Pumpkin Recipes
    • How to Make a Tempting Christmas Cookie Tray (Plus Recipes!)
  • Popular Posts
  • E-Books
    • Pretty & Practical Garden Planner
    • Cut Flowers Made Simple
    • Constant Colour Perennial Garden
    • Small Garden, Big Harvest
    • Growing Roots Online Gardening Course
    • Frost Proof Flower Garden
    • Bouquets Made Beautiful
    • Savvy Seed Saving Annual Cut flowers
    • Prairie Fruits Cookbook
    • Online Gardening Consultations
  • Seasons
    • Christmas

Everything You Need To Know to Make Beautiful Natural Dyed Easter Eggs

February 19, 2020

Pin1K
Share95
Tweet
1K Shares

Looking for a way to dye Easter eggs without food colouring or a kit? Look no further! There are lots of natural food dyes in your refrigerator and pantry. I’ll show you how the best ways to get pink, orange, yellow, blue and green eggs using vegetables and spices that you likely already have on hand.

Are you someone who likes a project with predictable results and simple directions?  This post is not for you.  Are you someone who likes surprises and is willing to experiment?  Carry on my friend.

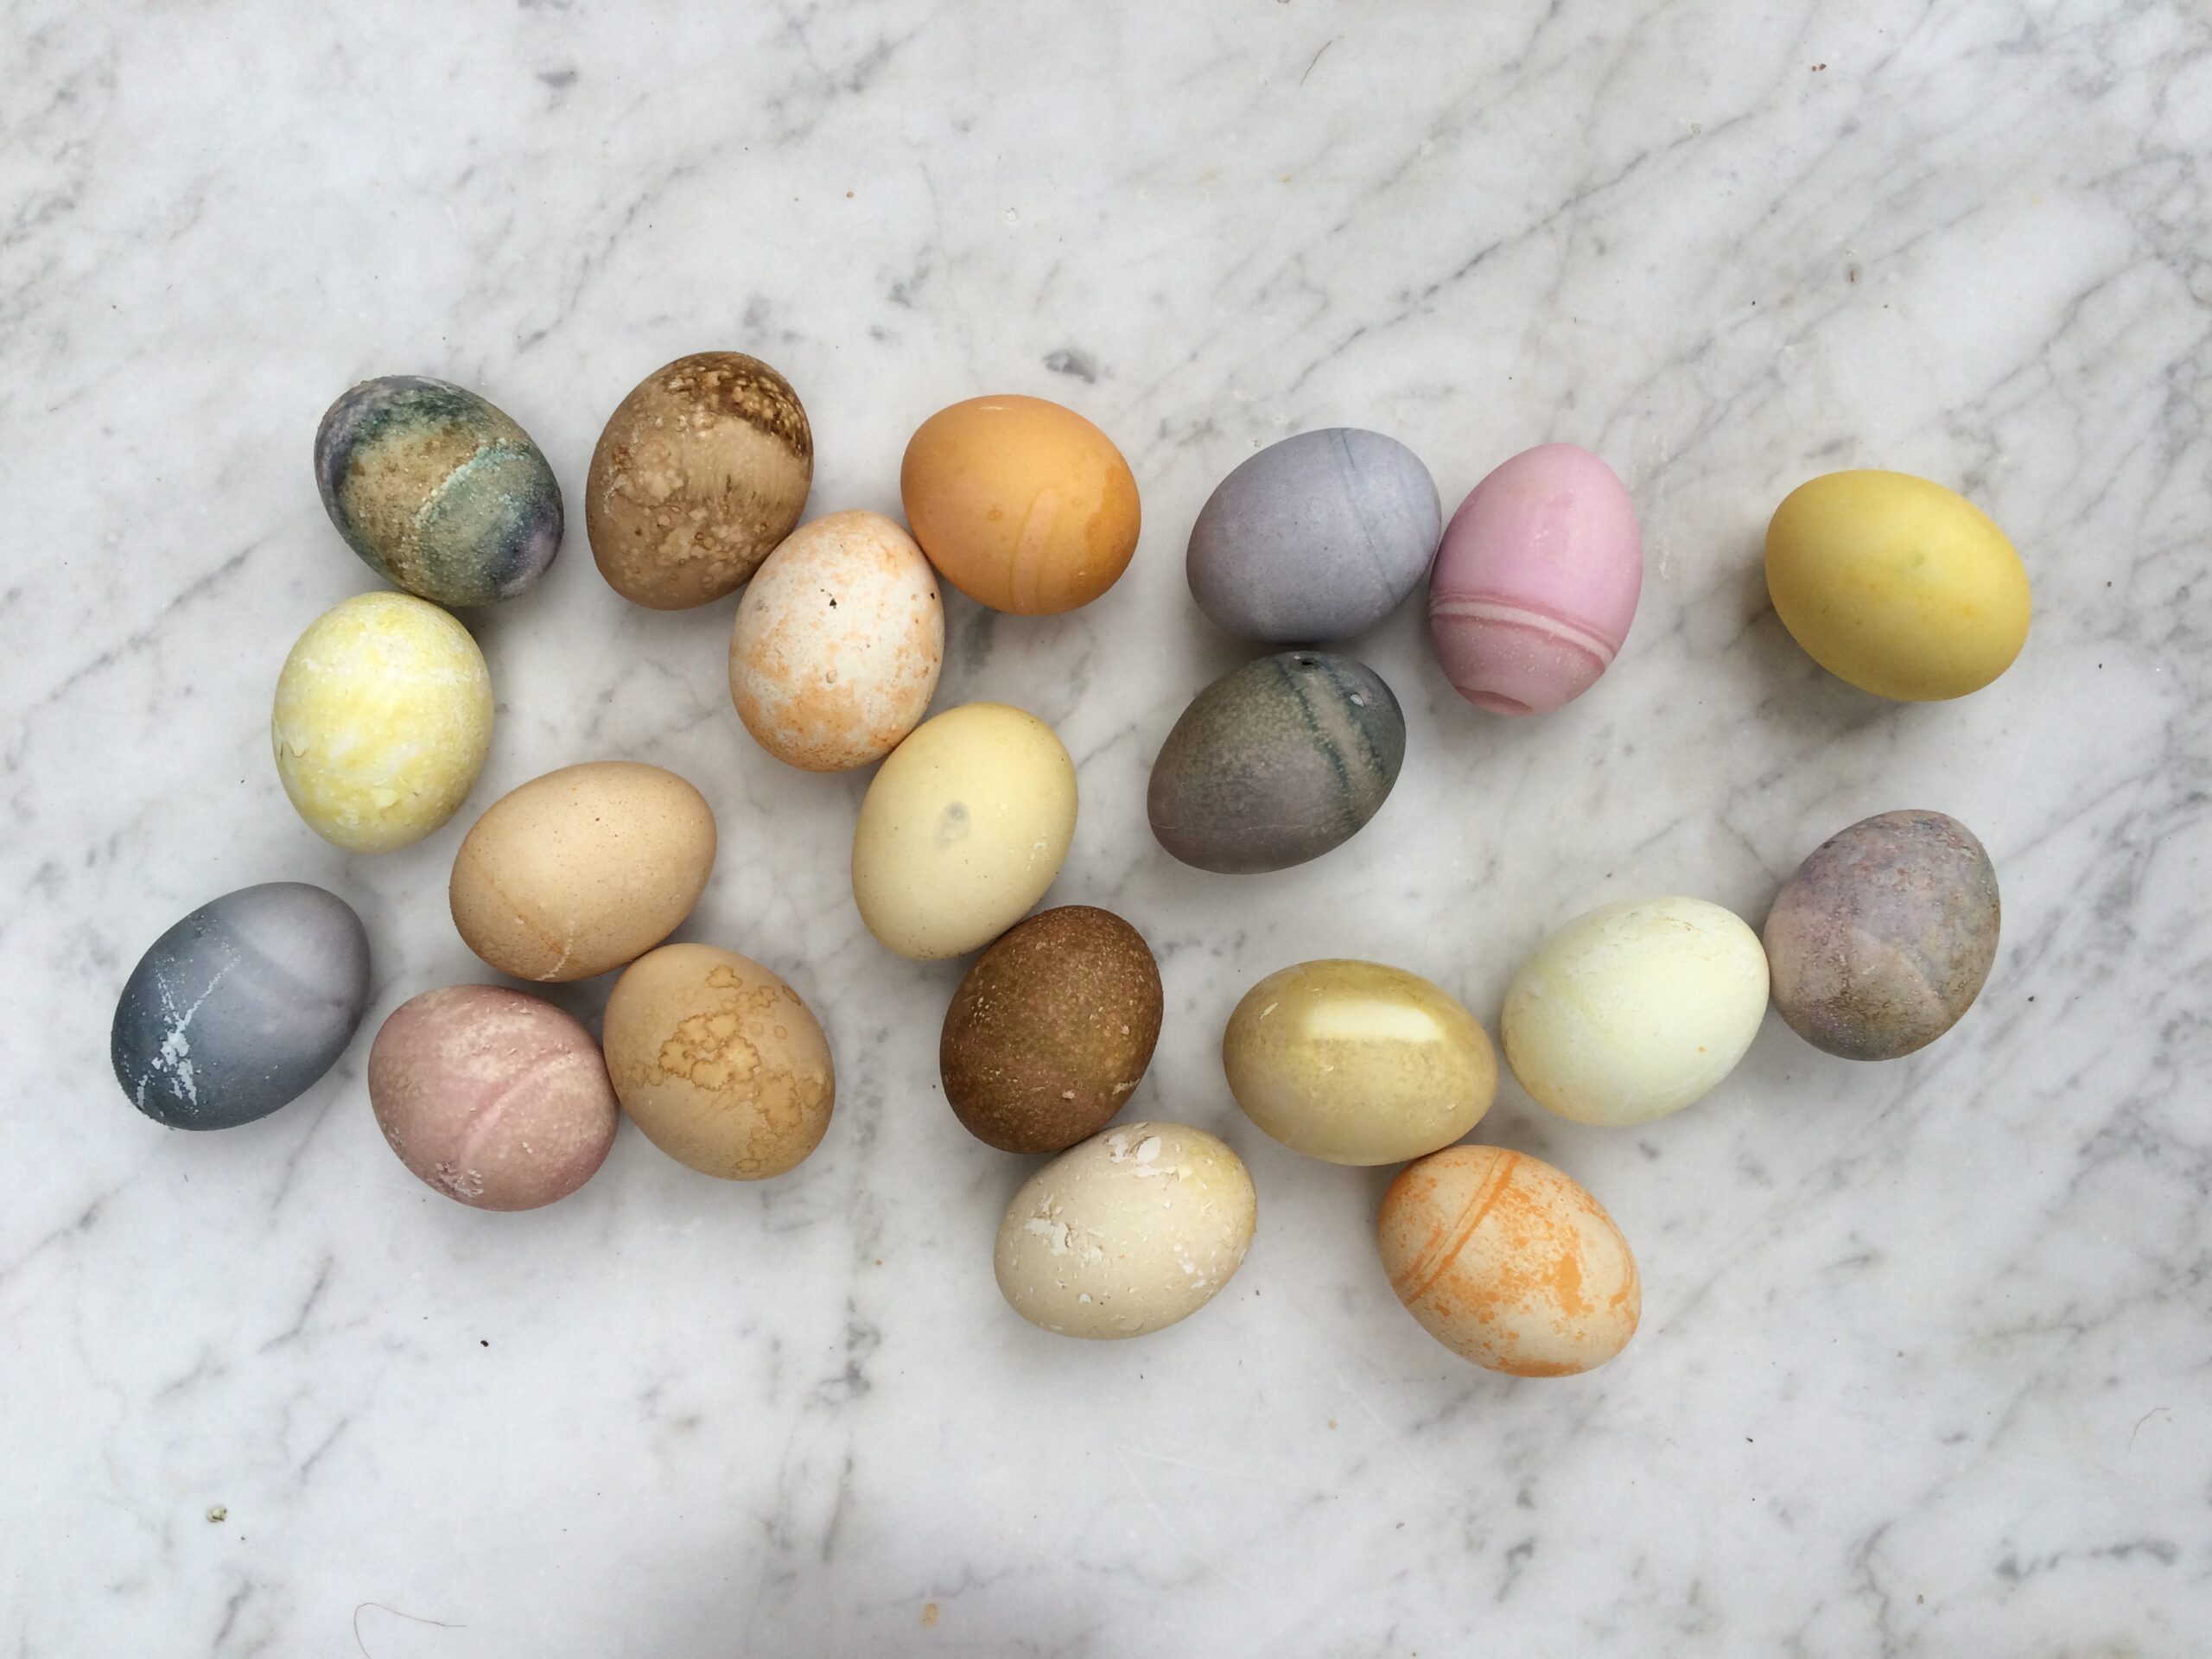
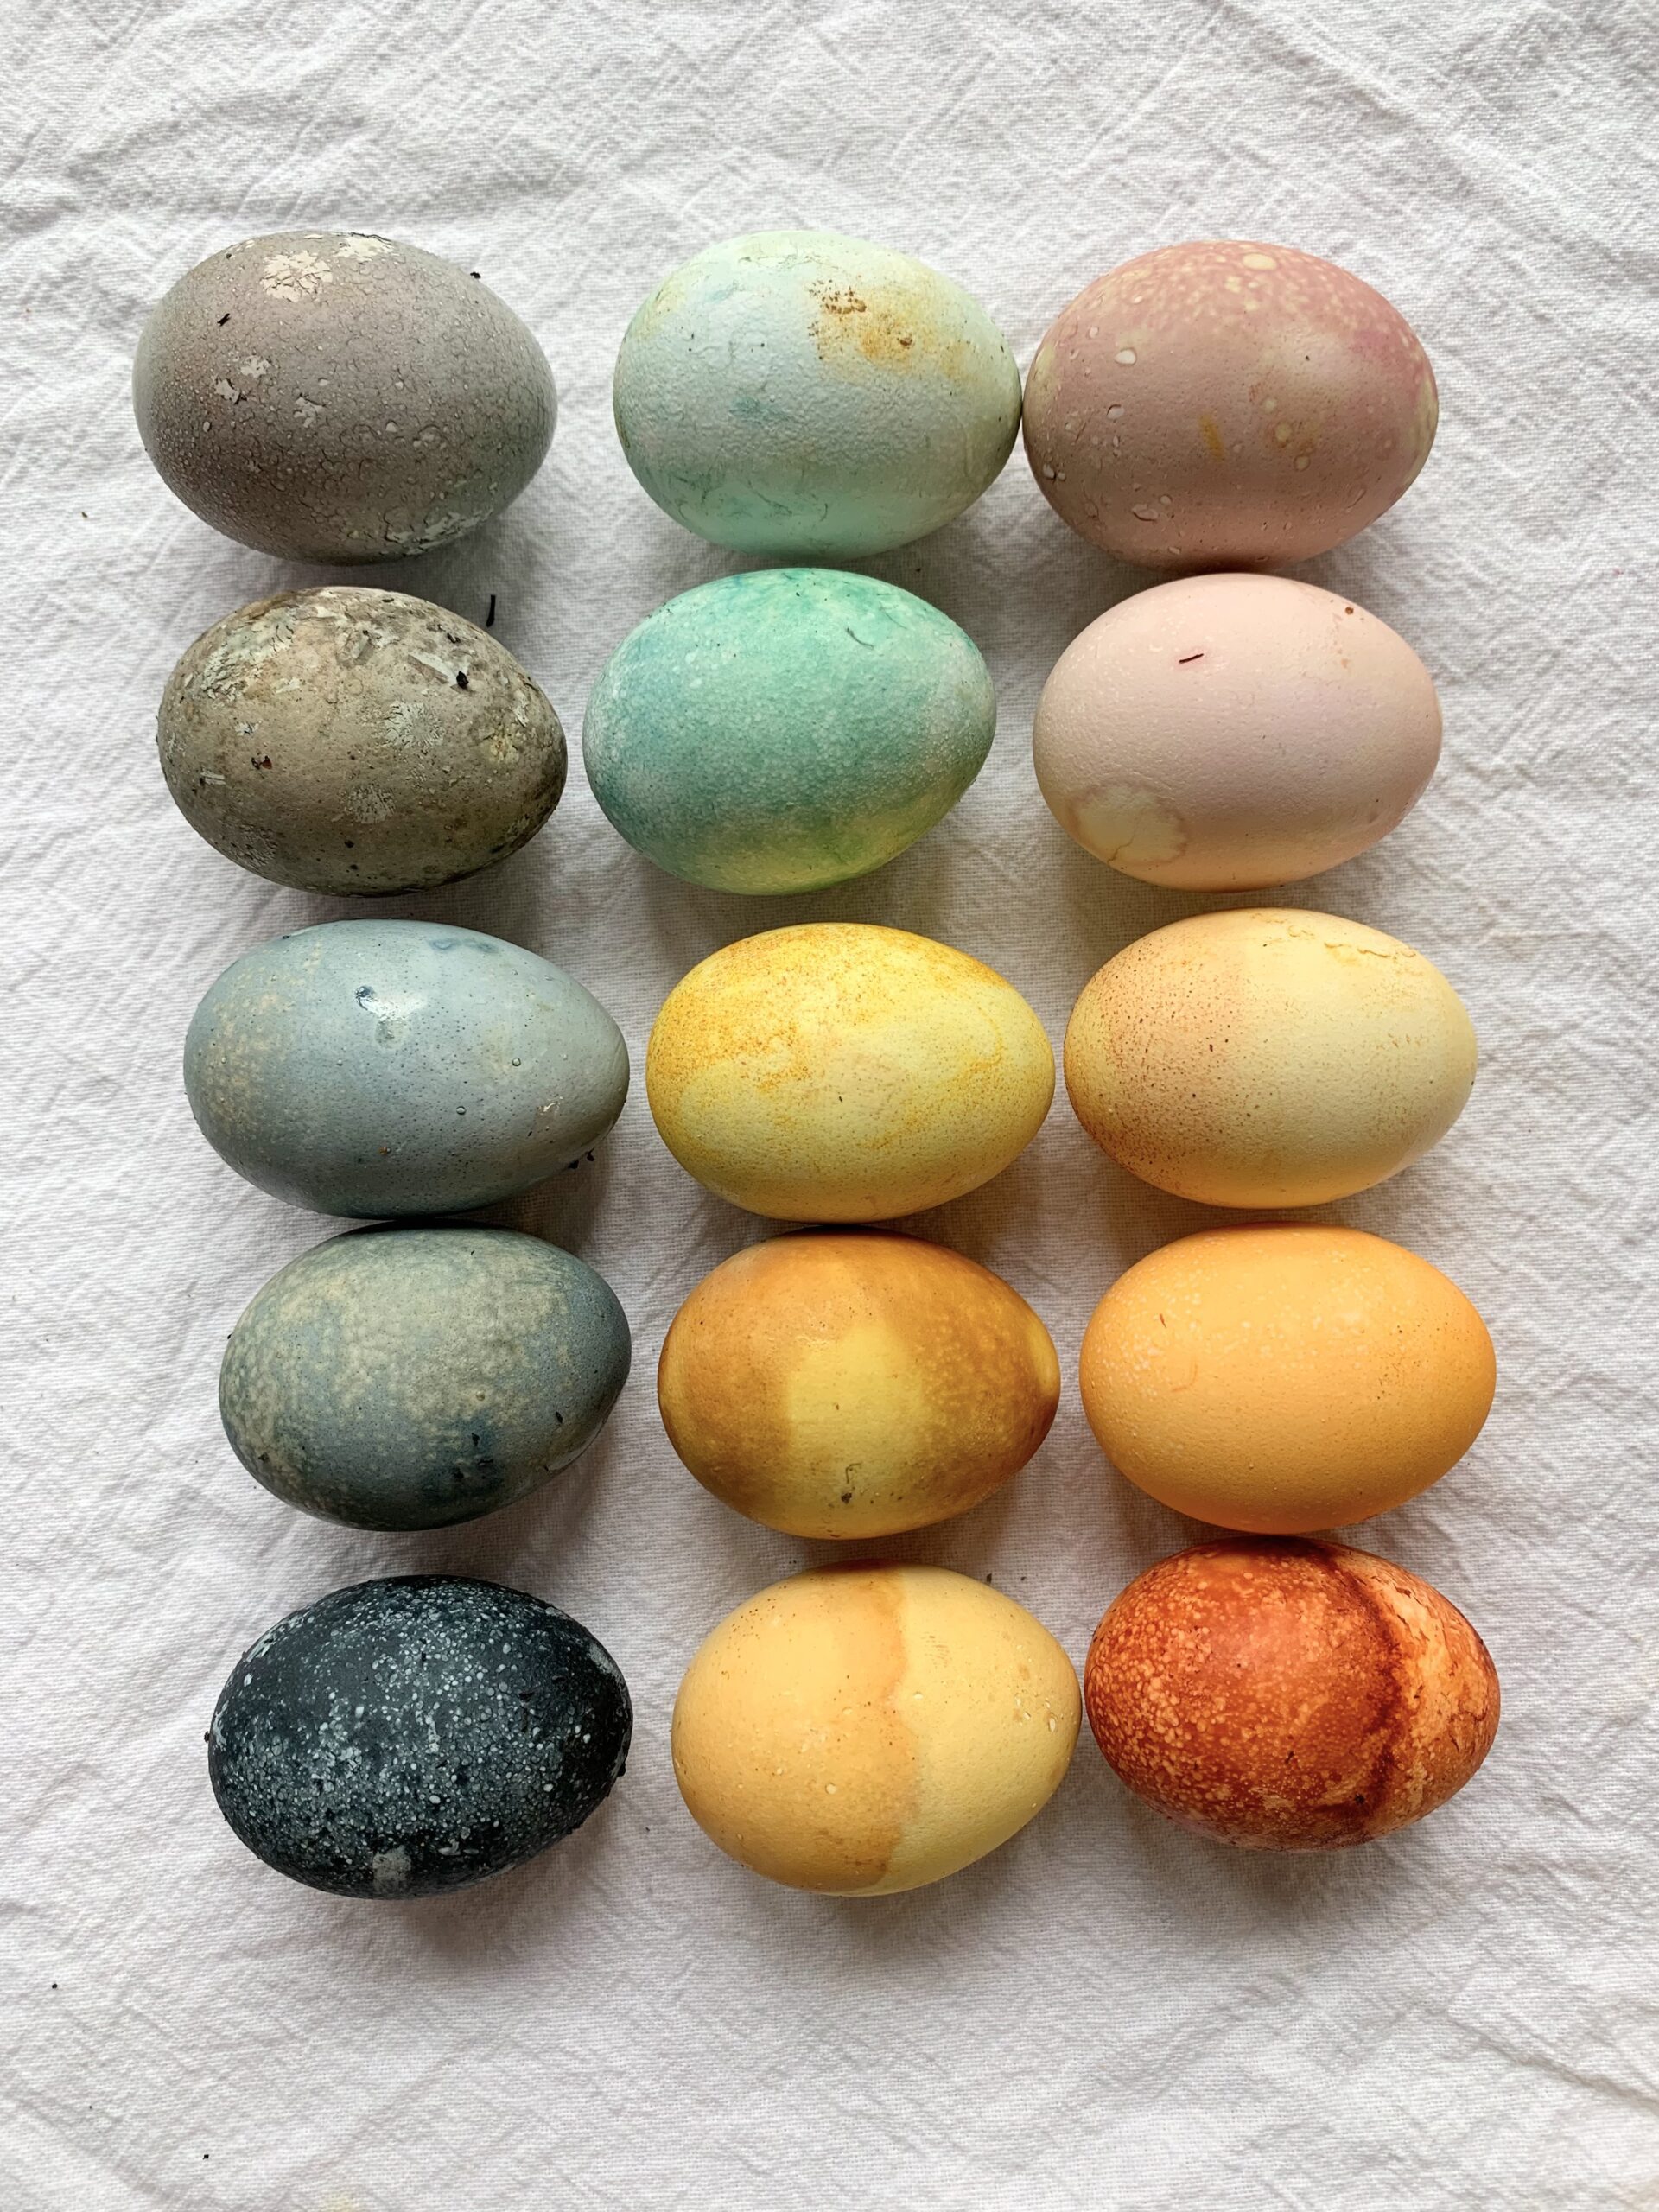
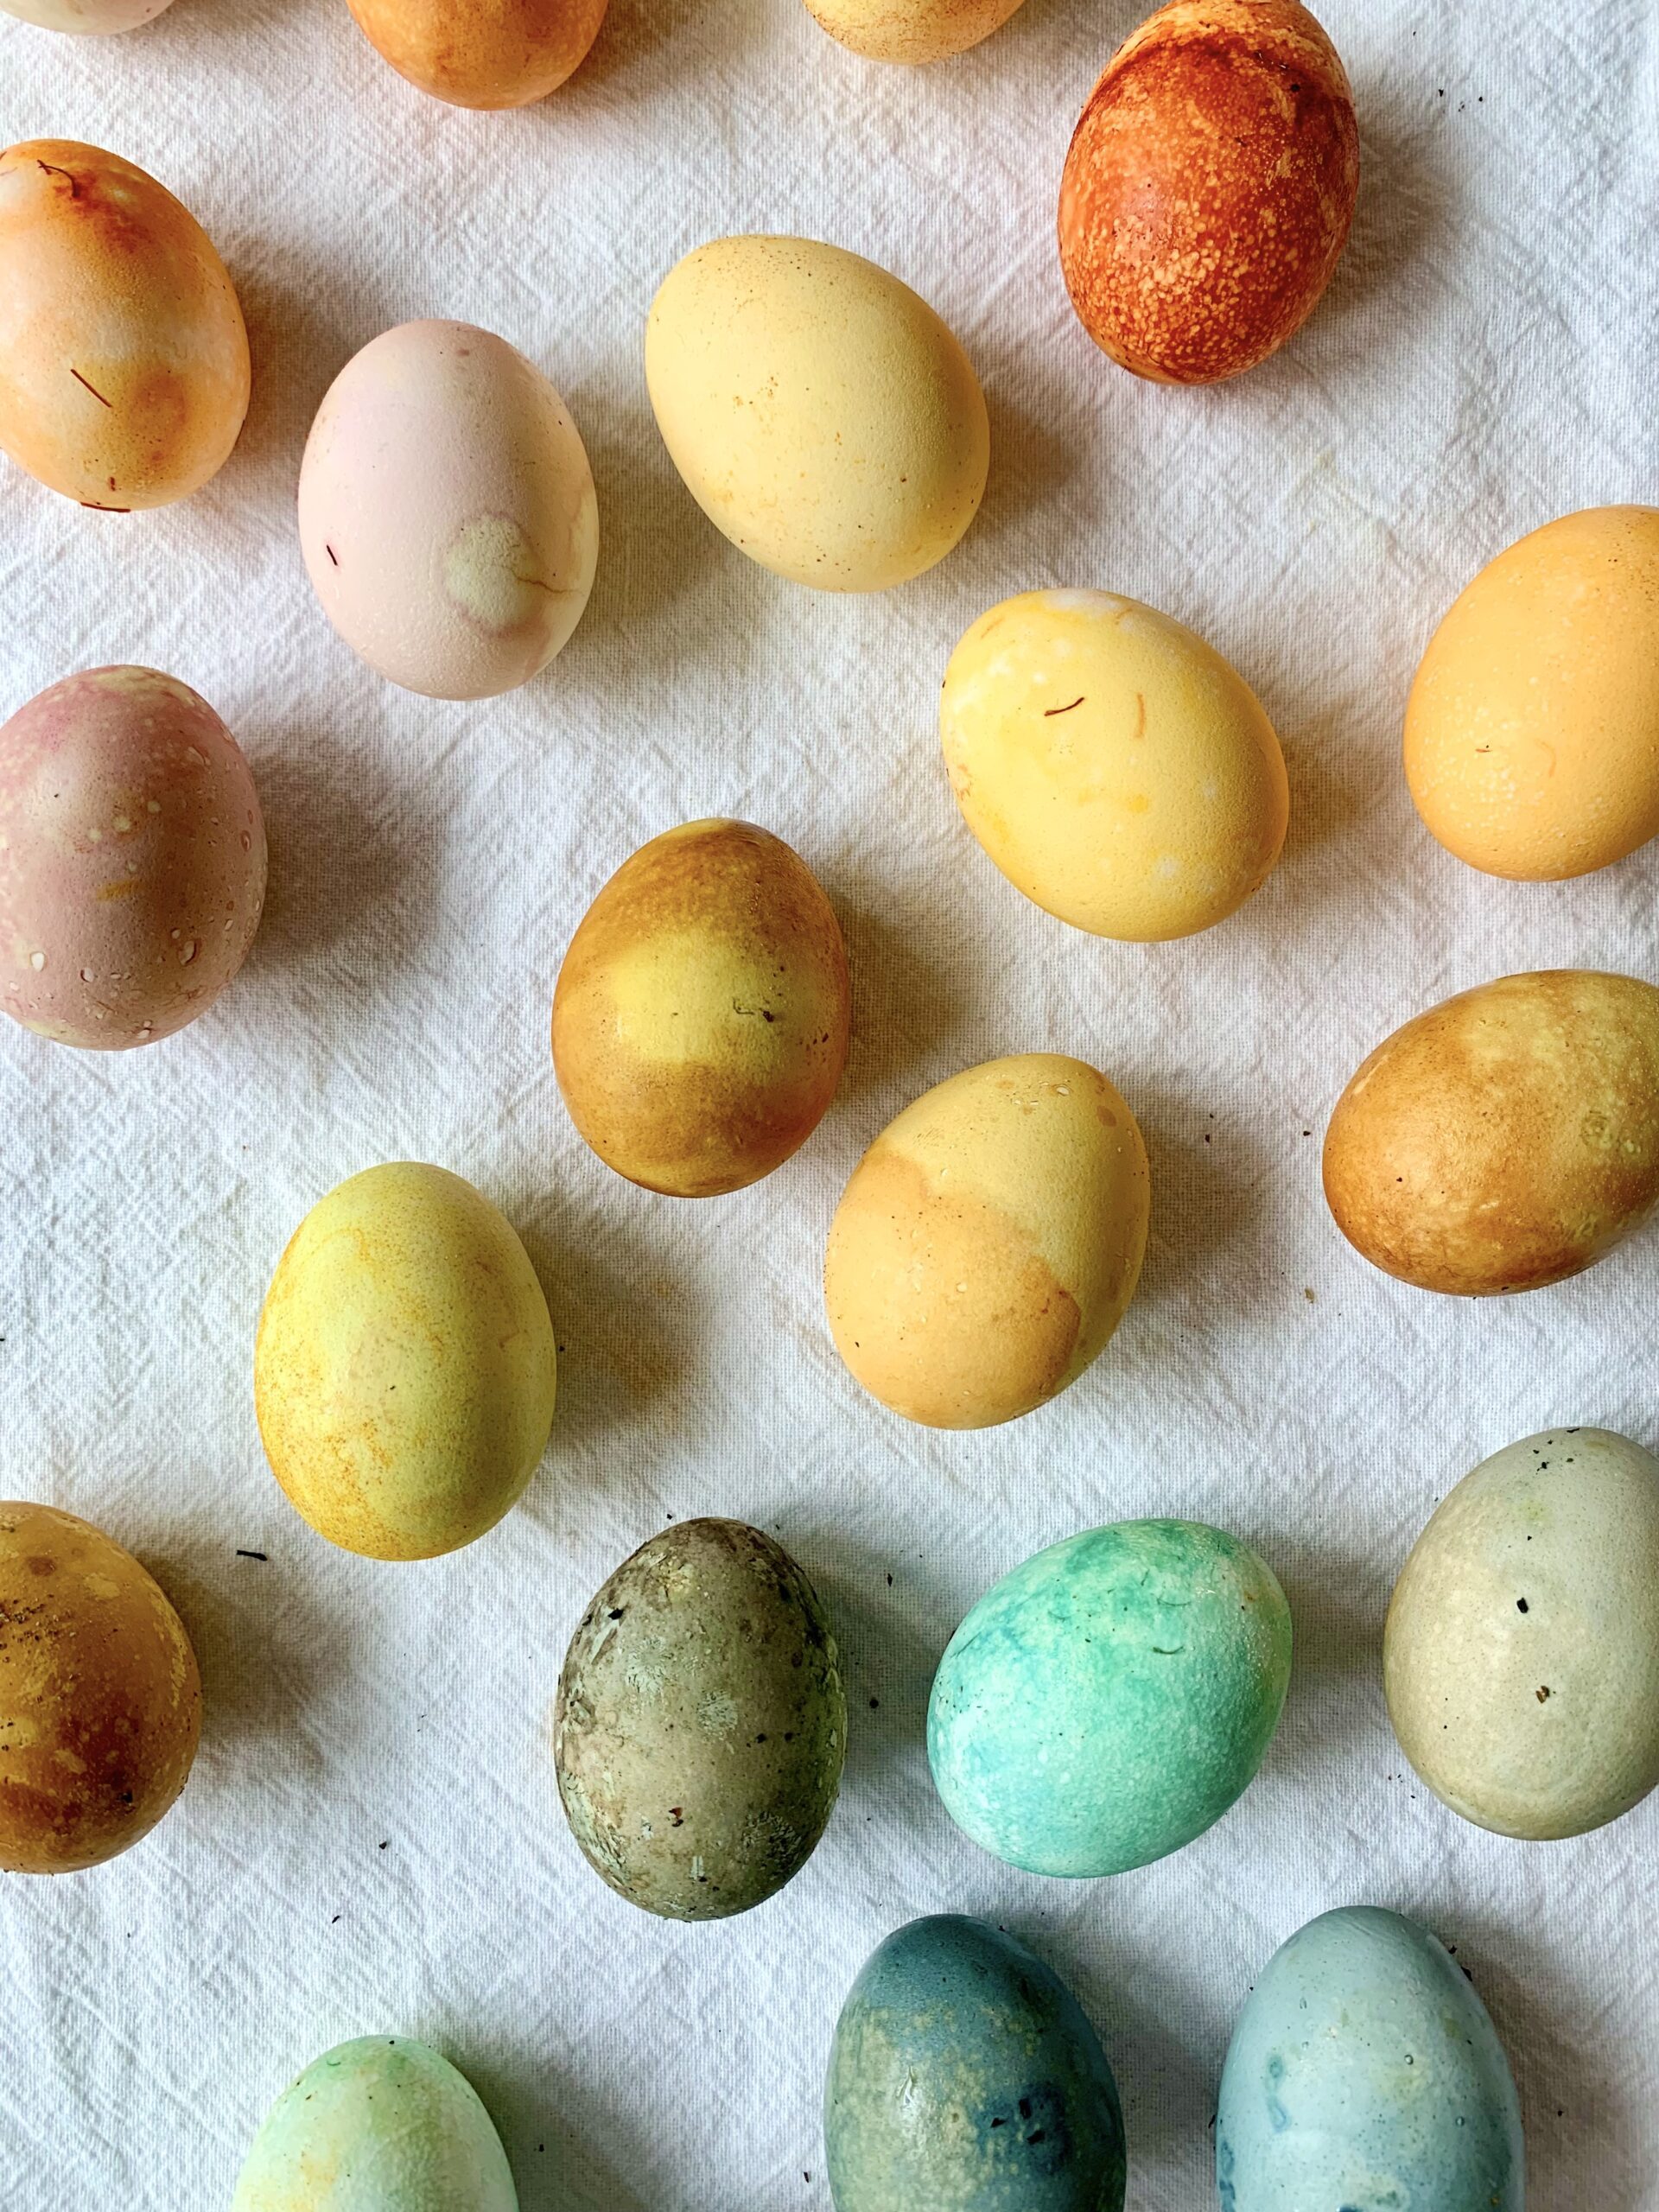
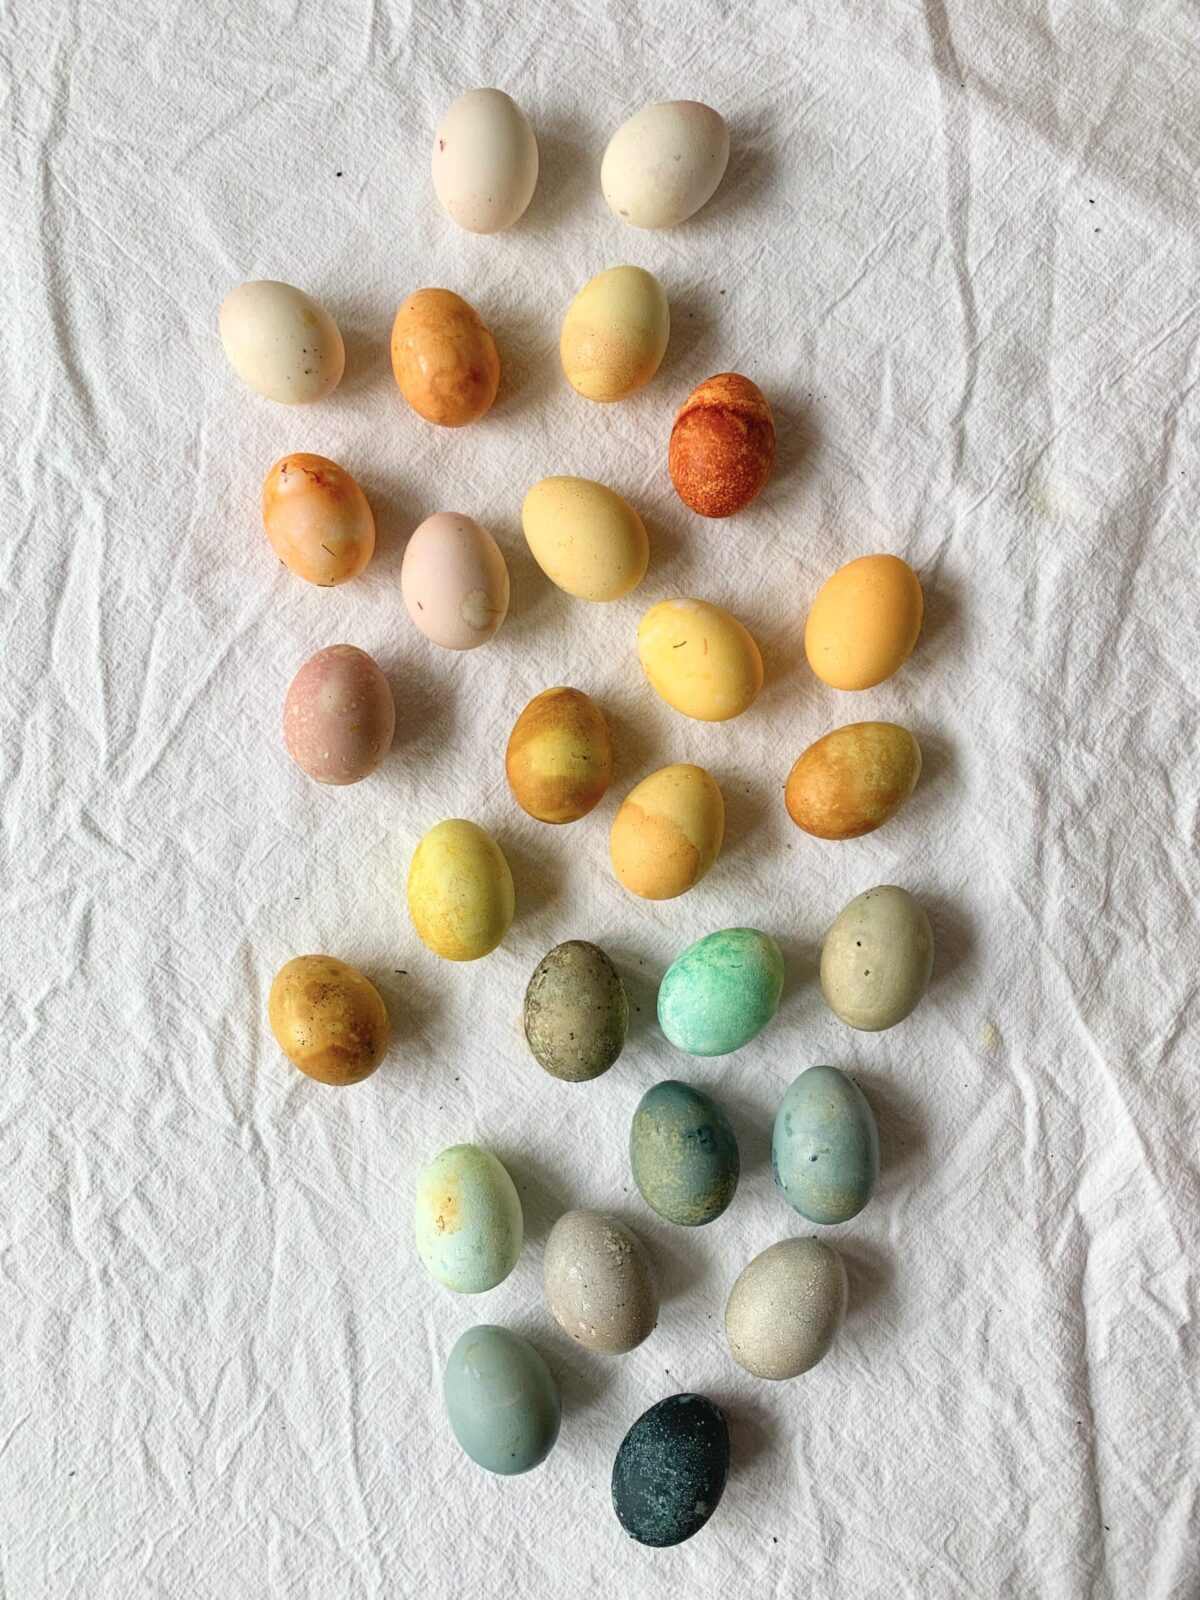
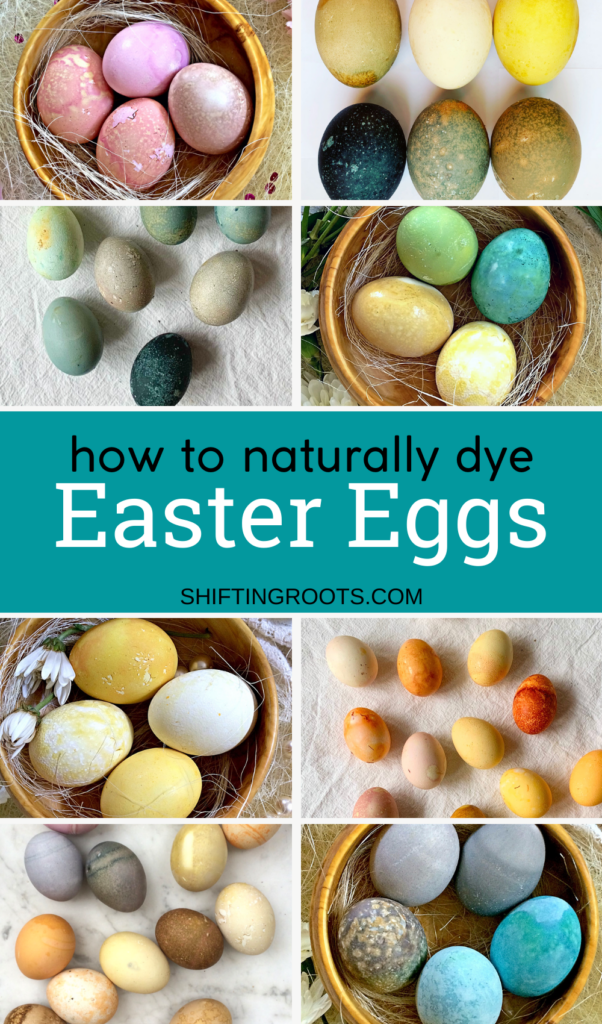
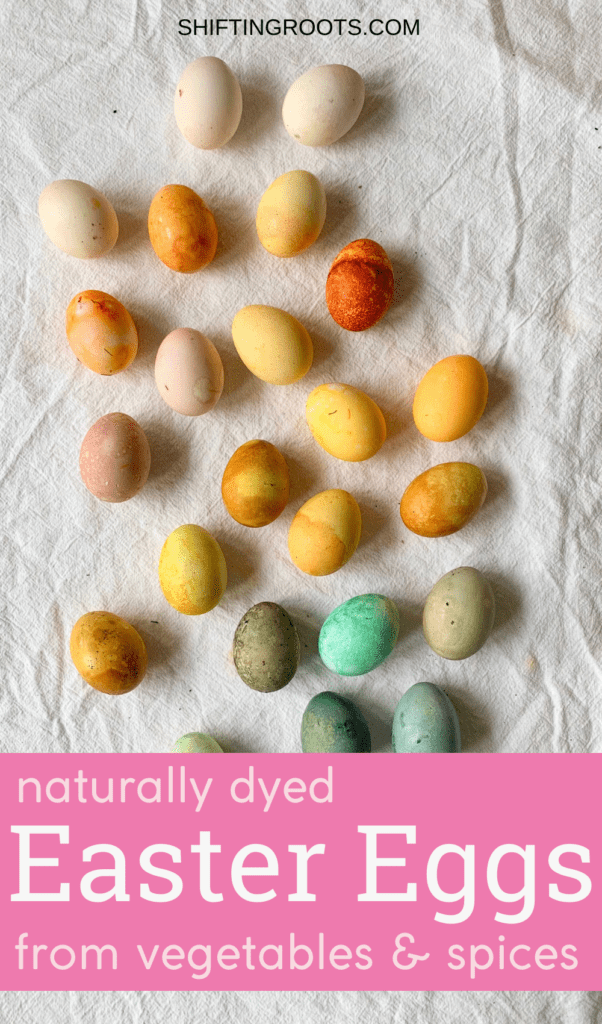
Recently I went a little bit crazy and was determined to find the best natural Easter egg dyes.  Over 2 dozen tries later I bring to you this comprehensive, no-nonsense guide to natural Easter egg dyes.

Getting Started

To dye your Easter eggs, you’ll need to choose your food-based dyes from the colour options below.  You’ll also need a bowl & spoon for each colour of egg, water & a pot for boiling, vinegar, patience, and a sense of adventure.

Natural egg dyes take a lot longer than ones made from food colouring!!  The fastest dyes needed a minimum of 10 minutes, but I was usually happiest with their colour after 30 minutes.  Average dyes needed 2-6 hours, and less efficient ones needed to sit overnight in the refrigerator.  (Don’t worry, I’ll go through every dye in painstaking detail, lol.)

Can you color eggs while boiling them?

After some trial and error, I found it was the most efficient to boil the eggs and the food to make the dye in the same pot, especially if you’re making a huge batch.  It gives a bit of a head start on the colour.  I tried adding the vinegar in the boiling step to one batch, but didn’t notice much of a difference.  Yes, you’ll be boiling three to seven eggs at a time, but you’ll also be saving yourself the step of boiling the dye then boiling the eggs.

If you’re only dying a small amount of eggs, put as little water as possible into the pot so that your dye will be as strong as possible.

Some problems with Naturally dying Easter Eggs

Be very careful when you remove your eggs from the jar.  Some of the dyes leave a film over the egg for their colour, and it is very easily scratched off.

You’ll also find in my notes that you need more food to make the dye than you may have bargained for.  In my first round of trials, I generally used a cup of the food for ones that needed to be boiled, and 2 tbsp spice to one 1/2 cups water for the spice-based ones.

Here’s a quick video showing my results in real life: 

How to Make Pink Natural Egg Dye
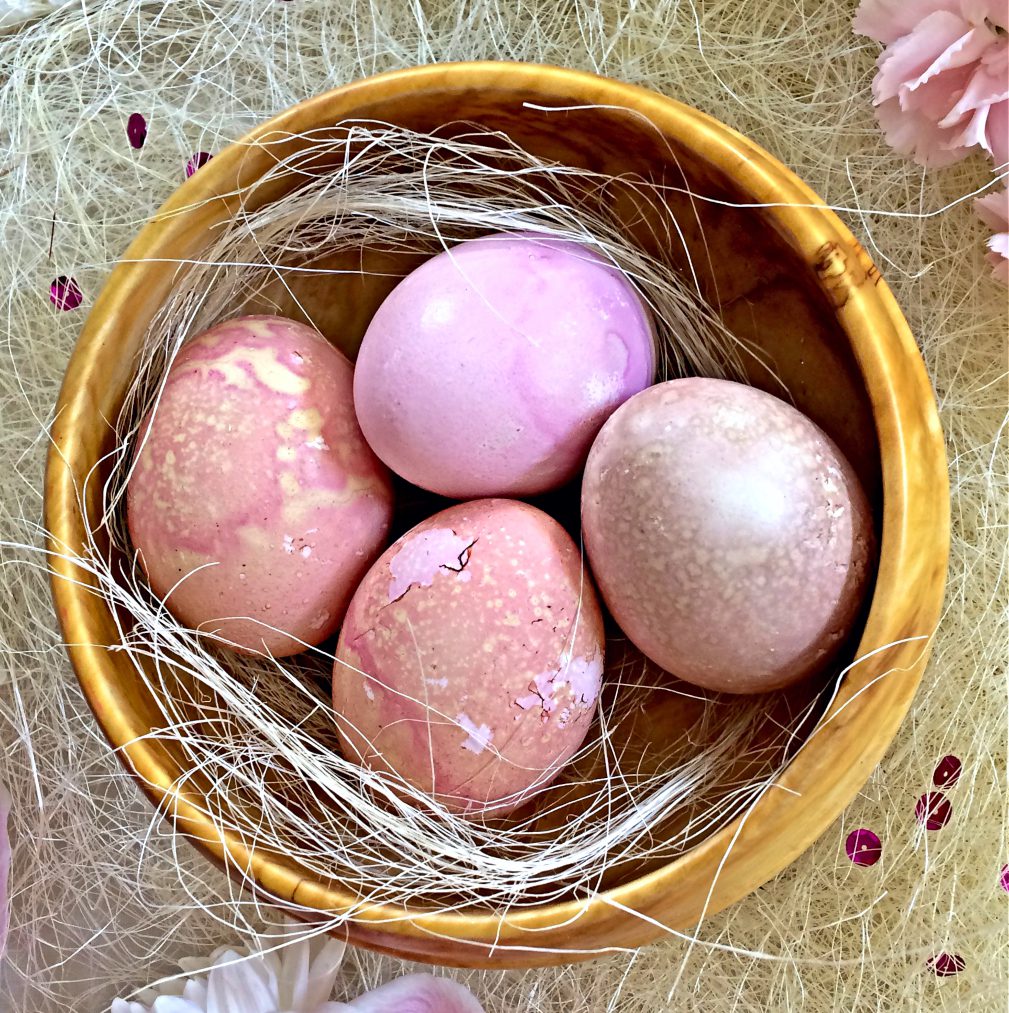
Juice from Canned Beets: We have a winner!  Juice from canned beets gives a beautiful bright pink colour and is one of the quicker dyes.  An egg dipped in canned beet juice and 3 tbsp vinegar needs only 10-20 minutes to reach a lovely shade of pink.  You can also colour the egg by making your dye from fresh boiled beets, but this method takes a lot longer.

Cherries:  I did my trials with sour cherry jam that I had canned in the summer.  I expected my eggs to turn pink, but they actually turned a beautiful shade of blue/purple.  I think if you used maraschino cherries you would likely get pink instead.  If anyone tries it, please let me know how it turns out!  My cherry jam dye took 8 hours to get to the desired colour.

Raspberries: Another beautiful option.  This produced more of a purply-pink and took 4 hours.  I only used 1 cup of raspberries to make my dye.  2 cups would likely yield quicker results.

Red Onion Skins: I’ve seen this make a beautiful deep red on Pinterest, but I ended up with a rich brown.  It was one of the quicker dyes, but I didn’t like the colour I ended up with, so I don’t recommend it.  However, if brown is your thing, carry on!

Side note: I wonder if the variety of onion makes a difference?  Mine may have been too purple?

Options I did not try: Red plums.  They’re definitely not in season around Easter where I live.

How to Make Yellow Natural Dye
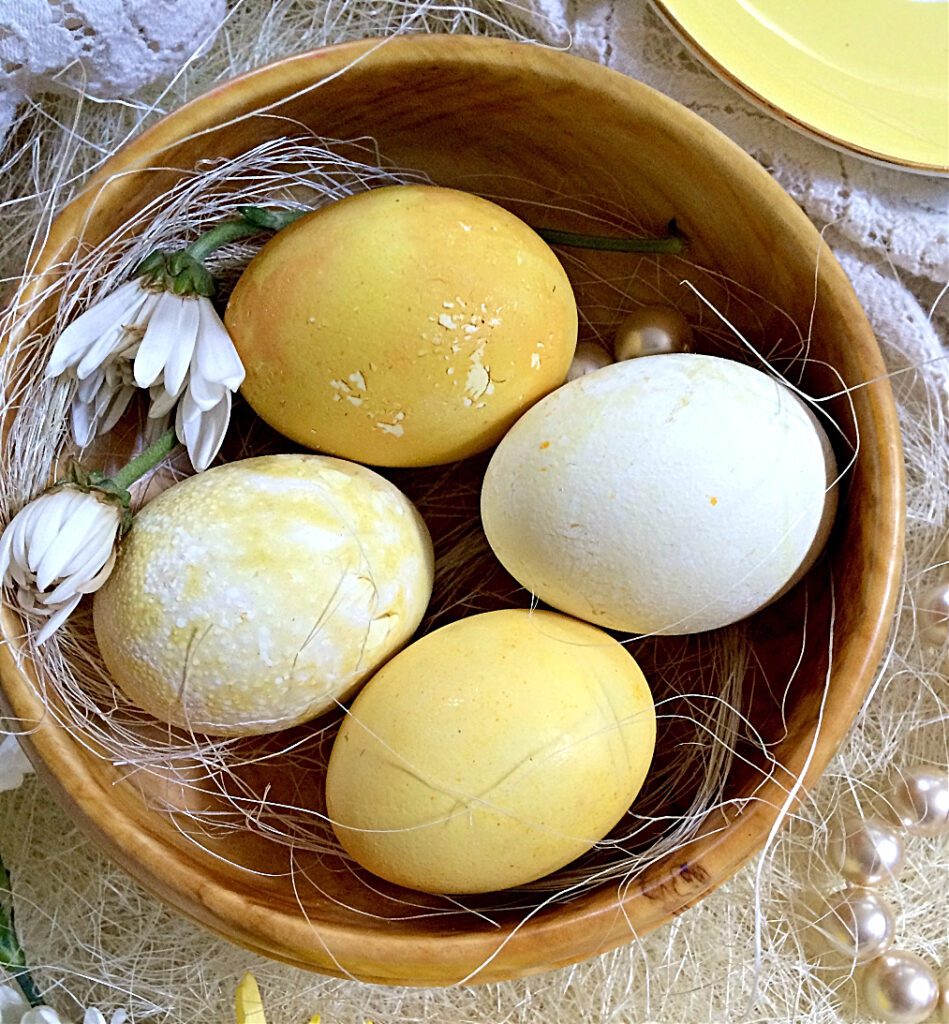
Turmeric: All the other yellow dyes can just pack up and go home.  Turmeric is the clear winner, needing only 8 minutes to dye an egg.  The colour is bright and sunny and so much prettier than anything else I tried.  Use two heaping tbsps for a pot of water to boil your eggs in.

Orange peels: While the orange peels worked, the colour was not vibrant enough to warrant leaving the dye overnight in the fridge.

Celery seed: I only had celery salt, so my results may not have been as good.  It produced a lovely yellow-green colour after 6 hours.

Saffron: This ingredient is expensive, but it makes the most beautiful yellow-orange shade very quickly. Sometimes you can purchase saffron cheaply at places like Homegoods, Winners, Marshalls, etc.

Green Tea: Makes a lovely light chartreuse colour. You can see my favourite teas for dying eggs in this post.

Options I did not try: Carrot tops.  Again, it’s a little harder to find carrots with their greens during this season.  Cumin, because turmeric and saffron work so well.  

You’ll love these easy Easter projects too!  Edible Easter Baskets and a gorgeous Mini Egg Cake.

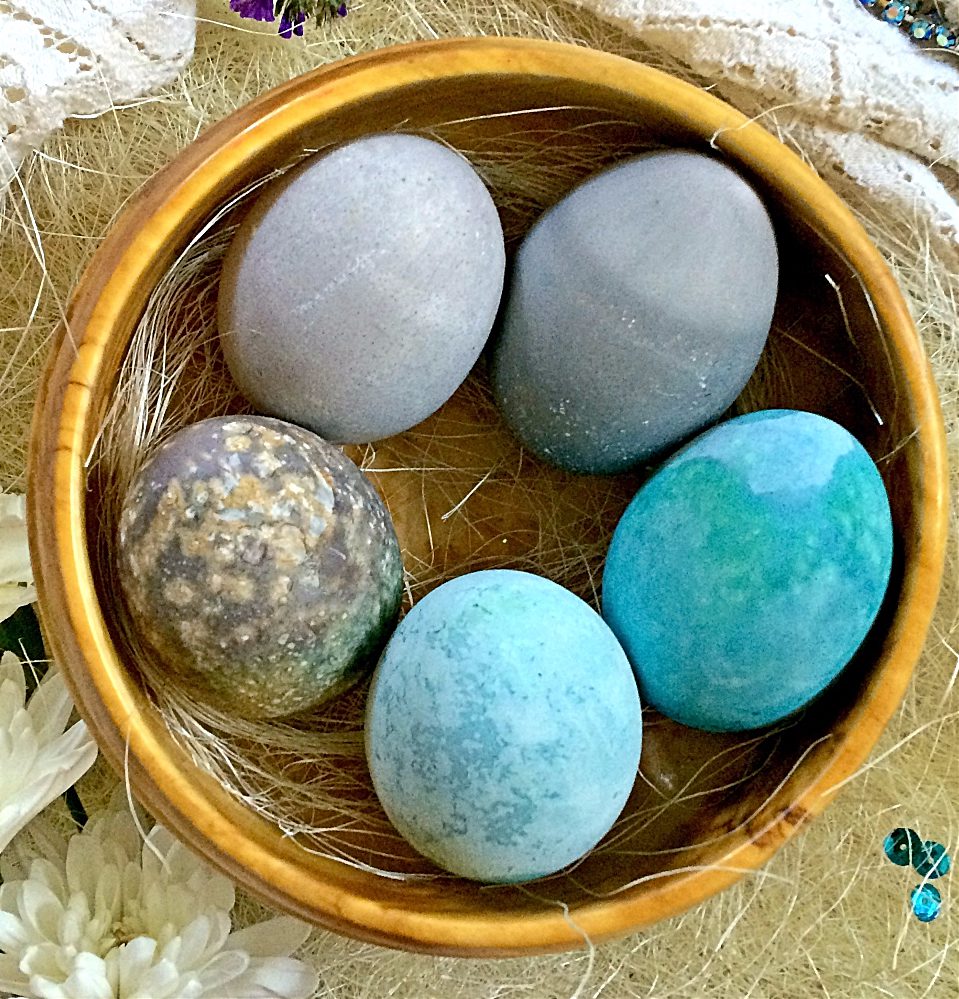
How to Make Blue & Purple Natural Dye

Purple Grape Juice: You must use a brand that has only purple grape juice and no other juices.  I used one that had a blend of mostly grape with some cranberry and apple.  It turned out dark brown.  If you do use this dye, boil your eggs directly in the juice.  Don’t add water unless your juice is actually pure grape juice with no water previously added.

Red Cabbage Leaves: This gives the most beautiful blue colour ever and is one of the quicker dyes.  Some pins on Pinterest show a gorgeous turquoise colour.  Maybe a different variety of red cabbage than was available in my grocery store?

Blueberries/Blueberry Tea: Blueberries are incredibly expensive this time of year, so I used frozen Saskatoon berries.  It worked well and gave a lovely blue/purple colour.  Use two cups of berries for best results.

Blueberry tea is the best for getting the lovely navy shade, like the one in the picture below. See how I did it in this post.

Learn over 24 ways to make beautiful natural dyed Easter eggs. I did all the hard work and experimenting so you don't have to.Click To Tweet

Blackberries: Lovely blue/purple colour and only 2-4 hours to dye.  1 cup of berries is sufficient.

Chokecherry Juice/Syrup: This was one of the faster dyes and left a really lovely blue/purple colour.  I used chokecherry syrup that I had canned in the summer.  I don’t think you’ll be able to find this ingredient in the grocery store, although I know there is a vendor at the Saskatoon Farmer’s Market who has chokecherry jam for sale.  Don’t add water to your juice or syrup for best results.

Hibiscus Tea: A truly gorgeous option for blue. Get the directions here.

Options I did not try: Mulberries.  We don’t have them in Saskatoon.  I also think Haskaps would work beautifully if you have any stored away.

Red zinger tea, red wine (who wants to waste wine on eggs?!?).

How to Make Orange Natural Dye

Yellow Onion Skin: Beautiful colour and quick results.  I used the skin from one onion and 1 1/2 cup water.  If you’re boiling your eggs with the onion skins, use two onions.

Chilli powder: This worked well.  It took about 4 hours for my desired colour.  My chill powder egg ended up a bit on the brown side.

Paprika: Same as chili powder.  It worked well and took around 4 hours.

Carrot Peels: I expected this to work a lot better than it did.  Don’t waste your time.

Tomato Sauce: This was an epic fail.  Sure, there was some orange dye, but it was not consistent.  I think pure tomato paste would work much better.

How to Make Green Natural Dye

Of all the colours, green natural dye is the hardest to get right. My favourite result is to mix turmeric and red cabbage leaf dyes, but using matcha tea is a close second. I don’t really like the colour that spinach results in, but if you like more earthy tones, it will probably be your favourite option.
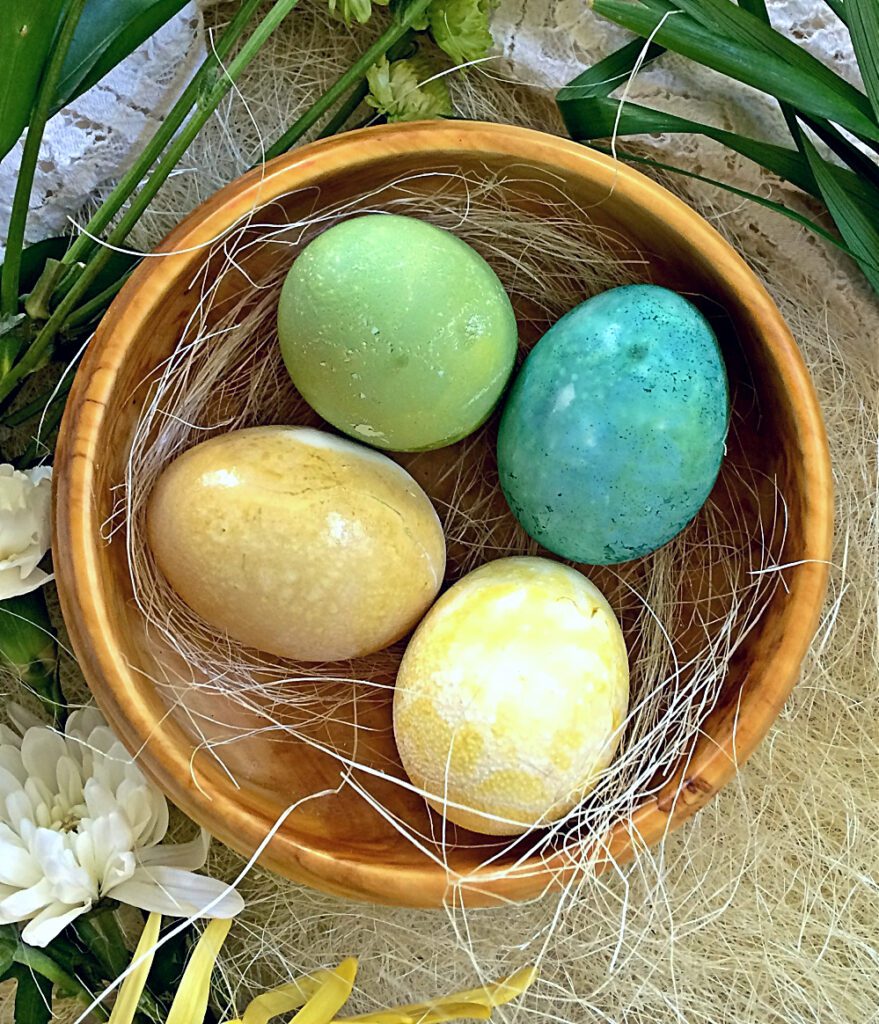
Spinach: Spinach works really well, needing only 2 hours to desired colour.  However, I was looking for a much brighter green, so I’m not a huge fan.

Kale: Kale gives off more of a yellow green, but it takes overnight to get to my desired colour.  I tried it a second time using more kale and it still took too long for my liking.

Matcha Tea: On the yellow side, but I really like the chartreuse colour it produces. Check out my results in this post.

Zucchini Skins: Just. Don’t.

In my research on natural egg dyes, there seemed to be only two options: spinach or grass.  There is no green grass at Easter in Saskatoon, so kale and zucchini skins were my experiments to try and get a better green.  In the end, I was happiest combining my turmeric and red cabbage dyes.

Options I didn’t try: Grass, but I’ll be trying it as soon as I can!

How to Make Brown Natural Dye

Since brown eggs can be easily purchased, I’m not a huge fan of dying eggs brown. But to each their own, and if you want to try it, here’s what to use.
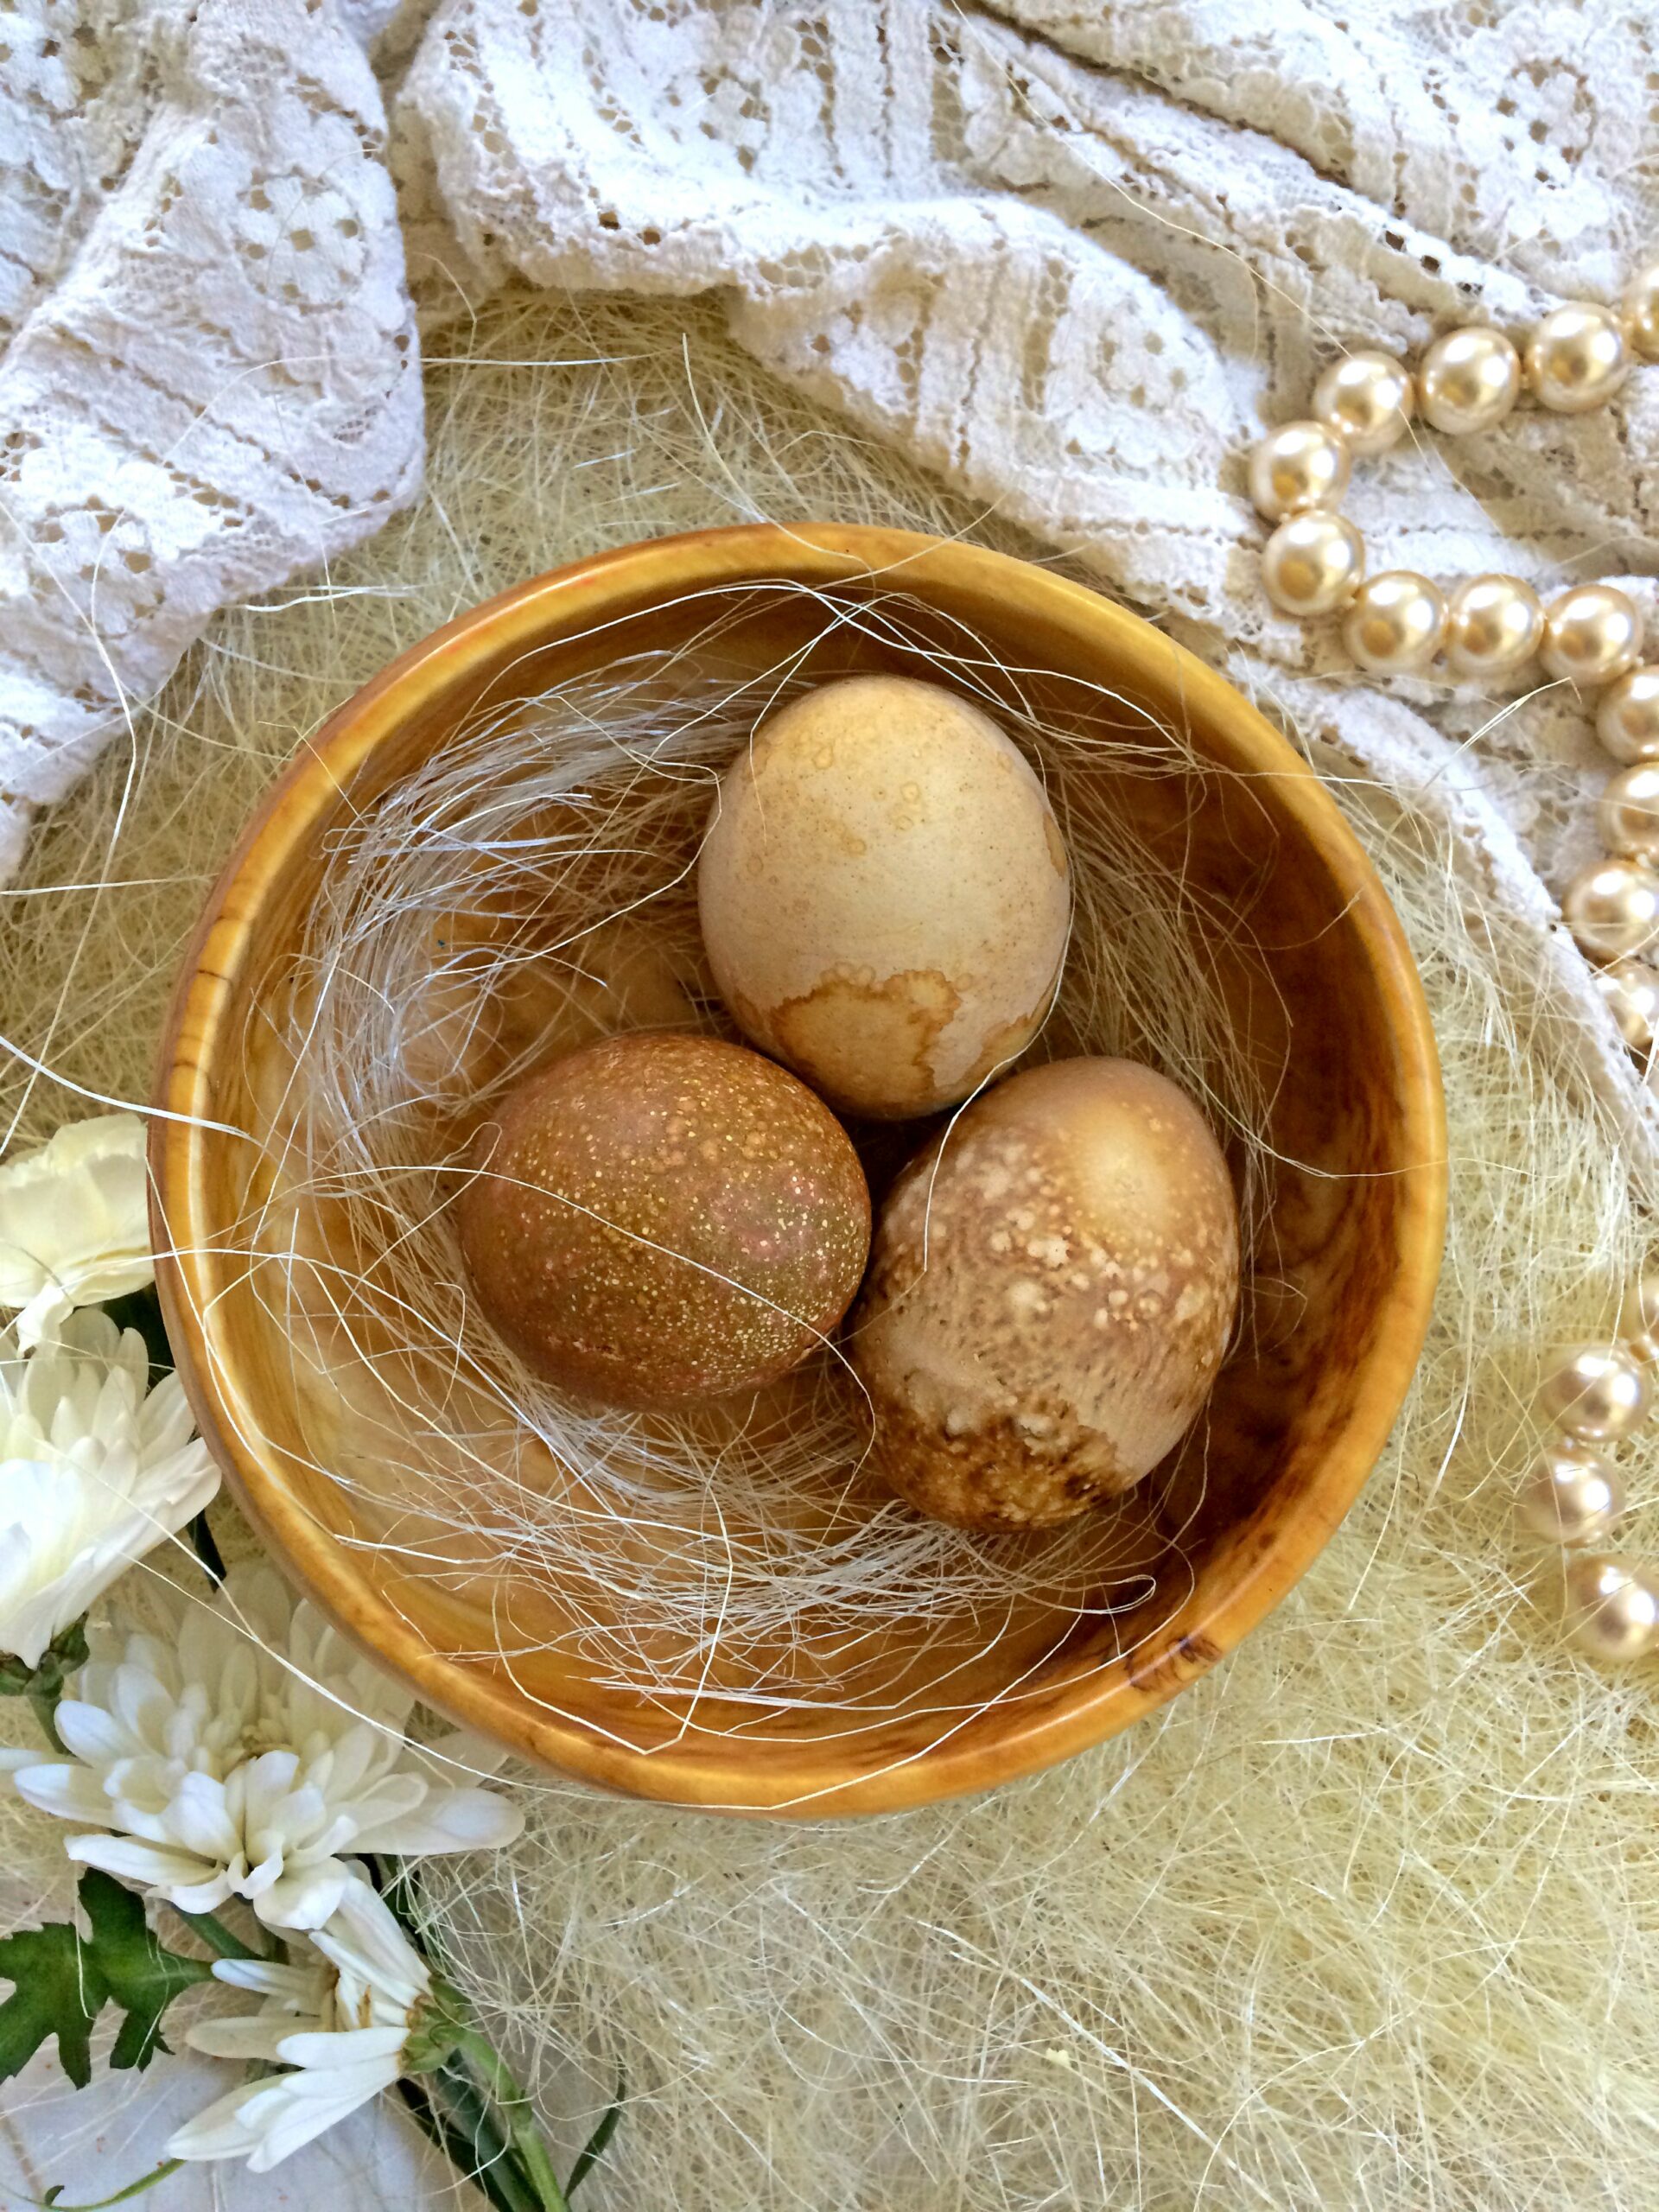
Top: paprika Right: coffee Left: red onion skins

Coffee: Just use coffee.  You likely already have it on hand and it makes a lovely brown within an hour or two.  If you make your coffee twice the normal strength you could make that time faster.

Side note: you can also use black tea.  I wasn’t as eager to dye eggs brown because you can easily buy brown ones at the store.

Dyes that weren’t supposed to be brown but ended up brown: Grape juice (mixed juices), red onion skins, chilli powder.  Again, I think this could vary wildly depending on what variety of each product you use.  If someone knows which variety works best, please leave it in the comments!

Method

With traditional dye, it’s easy to dye eggs one by one and be done the whole project in under an hour.  Not so with natural dyes.  I suggest boiling the amount of eggs you want a certain colour in the same pot as those ingredients (if you have a lot of eggs you want to dye) or using the least amount of water possible (if you only want to dye a few).

For example, if I wanted 3 blue eggs, I would boil the three eggs in a pot with at least 2 cups of shredded cabbage and just enough water to cover the eggs.  Once the water comes to a boil, let them cook for 12 minutes.  Remove the eggs from the pot and place them in a bowl.  Pour some of the liquid from the pot into the bowl.  (Enough to cover the eggs).  Add 2-3 tbsp of vinegar and let sit for 10-30 minutes, or until your desired colour is achieved.  For really dark or vibrant colours, put the bowl of eggs in the fridge and check every couple of hours, or leave overnight.

As a general rule, if you’re using a food as a natural dye, use two cups or more of that food.  If you’re using a spice, use 2 tablespoons.  If you’re using juice, use straight juice, and only add water if there is no water already added in the ingredients.

You can make your eggs shiny by rubbing a small amount of oil over them.

**UPDATE** Check out this page for reader results and photos!  Send me your pictures to be featured here.

Kristen Raney

Kristen is a former farm kid turned urban gardener who owns the popular gardening website, Shifting Roots.  She is obsessed with growing flowers and pushing the limits of what can be grown in her zone 3b garden.  She also loves to grow tomatoes, but oddly enough, dislikes eating them raw.

26 Comments
Filed Under: DIY, Easter, Zero Waste Tagged: Beets, blackberries, cabbage, chokecherries, dye, Easter, easter eggs, food dye, Juice, Kale, natural dye, raspberries, saskatoon berries, spice dye, Spinach, turmeric, zero waste

About Kristen Raney

Kristen is a former farm kid turned urban gardener who owns the popular gardening website, Shifting Roots.  She is obsessed with growing flowers and pushing the limits of what can be grown in her zone 3b garden.  She also loves to grow tomatoes, but oddly enough, dislikes eating them raw.

Comments

  1. Cheyenne says

    April 6, 2017 at 3:27 pm

    These are gorgeous! Love this!
    Reply
  2. Robin says

    April 6, 2017 at 6:57 pm

    Gorgeous photos!! Love how different each one is!
    Reply
  3. Jessica Devlin Design says

    April 6, 2017 at 8:25 pm

    i was just looking for this exact thing! fell into my lap. thank you so much for sharing.
    Reply
  4. Kristin Cook says

    April 10, 2017 at 4:45 am

    Those are so pretty! I actually love your tomato juice fail ;)
    Reply
    • Kristen Raney says

      April 11, 2017 at 6:48 am

      Thanks! It's funny you should say that, my mother-in-law said the same thing to me today.
      Reply
    • Jackie says

      March 12, 2019 at 11:15 am

      Mee too!
      Reply
  5. Jan says

    April 13, 2017 at 11:03 am

    Kristen, I've only done 'natural' Easter egg dying 1time in my long life (60 last year) and that was a long time ago in a class of 25 kindergarten children using yellow onion skins. The results were beautiful! The stress level on me, the substitute teacher? Let's not talk about that, shall we? We, or I guess I should say 'I', had to wrap our hard-boiled eggs with the onion skins and fasten them in place with elastics, in order to get the beautiful colours and patterns from the skins. Now I know why the teacher called in sick and left that activity in the plans for me. ? I'm much more impressed with your results. Absolutely gorgeous!
    Reply
    • Kristen Raney says

      April 14, 2017 at 8:28 am

      You were so brave to manage that project, especially as a substitute teacher! I could literally see the sweat pouring off of D's pre-K teachers after the Easter egg decorating party.
      Reply
  6. Malissa // Quotation Re:Marks says

    April 14, 2017 at 10:19 pm

    OMG these are absolutely gorgeous! And I like those colors so much more than the way those other store bought dye kits. Thanks so much for sharing this awesome post! - MG https://malissagreenwood.com/reviews/
    Reply
  7. Kathy says

    April 16, 2017 at 7:58 pm

    Love this post!! I'm a friend of Naomi's, we met at Evelyn's christening. I enjoy your blog so much, thank you!
    Reply
    • Kristen Raney says

      April 17, 2017 at 7:08 am

      Thanks for stopping by the blog and saying hi! I remember you!
      Reply
  8. Coralee says

    February 27, 2018 at 11:56 pm

    What a beautiful post. Thank you so much for your patience and lovely experimentation. You are an inspiration to me!
    Reply
    • Kristen Raney says

      February 28, 2018 at 7:47 am

      Thank you! I'm so glad you liked the post. I'd love to see your results if you try it out this Easter.
      Reply
  9. Kay says

    March 16, 2018 at 7:17 am

    I loved this idea and what beautiful natural colors they are. So much better for us too.
    Reply
    • Kristen Raney says

      March 16, 2018 at 10:57 am

      Thank you!
      Reply
  10. Susan says

    March 20, 2018 at 9:27 am

    These are gorgeous. I haven't decorated Easter eggs in years but these made me want to rush right out to buy the ingredients. I thought this would be fun as a co-op where the colors were divided between 3 or 4 ladies, each dying a dozen eggs and then shared. My favorites are the blotchy ones...blackberry, coffee and tomato sauce.
    Reply
    • Kristen Raney says

      March 20, 2018 at 11:17 pm

      That's such a good idea! I hope you have fun making them with your friends, and I'd love to see your results!
      Reply
  11. Iveta says

    April 16, 2019 at 8:40 am

    Gorgeous! I would like to ask how you achieved the two-color (almost tri-color) of the purple egg. And how is it, that the colour is so speckled? It looks amazing!
    Reply
    • Kristen Raney says

      April 17, 2019 at 2:53 pm

      If you leave the egg in the fridge in the brown cardboard type of egg cartons, the moisture will change the colours a bit, creating that cool effect.
      Reply
  12. Katie says

    April 5, 2020 at 11:25 am

    Excited to try this given the quarantine situation and lack of on hand materials. Your eggs turned out beautiful! Thank you!
    Reply
    • Kristen Raney says

      April 6, 2020 at 11:14 am

      Thank you! I hope you enjoy this project.
      Reply
  13. David says

    April 9, 2020 at 10:53 am

    Does it matter if it’s brown or white eggs?
    Reply
    • Kristen Raney says

      April 13, 2020 at 1:25 pm

      White eggs are best, but I think brown eggs would make some interesting colours too.
      Reply

Trackbacks

  1. 5 Fun Easter Crafts That Won't Harm the Environment - National Viral says:
    April 12, 2017 at 3:01 pm
    […] fruits and veggies and they’re stunning! Want to learn the secret on how to do it? Check out Shifting Root’s post here: She’ll teach you which fruit and vegetables to use to make different colors, and how long to […]
    Reply
  2. 25 Adorable Easter Egg Dyeing And Decorating Ideas - Crazy Laura says:
    March 12, 2019 at 10:13 pm
    […] Source: Shifting roots […]
    Reply
  3. 5 Easy Easter Menus For Any Lifestyle | Mermaids & Mojitos says:
    March 26, 2020 at 2:14 pm
    […] Decorated Easter Eggs – I’m totally obsessed with these dyed eggs using natural- food safe ingredients. […]
    Reply

Leave a Reply to Jan Cancel reply

Your email address will not be published. Required fields are marked *

This site uses Akismet to reduce spam. Learn how your comment data is processed.

Grow roots with us

  • Email
  • Facebook
  • Instagram
  • Pinterest
  • Twitter
  • YouTube

Welcome!

Hi, I'm Kristen and I help new gardeners learn to grow their own vegetables and beautify their yards. I also share recipes that use all that delicious garden produce. Grab a coffee (and your gardening gloves) and join me for gardening tips, simple recipes, and the occasional DIY, all from the lovely city of Saskatoon, Saskatchewan.

P.S. First time gardener? You'll want to download the quick start gardening guide below!

Recent Posts

  • Protected: 5 Easy Ways to Increase Pollination in Your Vegetable Garden
  • Bloom Times: What Cut Flowers Grow When in Zone 3
  • The Best Vegetables & Flowers to Start with Winter Sowing
  • 21 Cut Flowers to Grow in Part Shade
  • The Best Grow Lights for Seedlings (from Budget to Bougie)

Welcome!

Hi, I’m Kristen and I help new gardeners learn to grow their own vegetables and beautify their yards. I also share recipes that use all that delicious garden produce. Grab a coffee (and your gardening gloves) and join me for gardening tips, simple recipes, and the occasional DIY, all from the lovely city of Saskatoon, Saskatchewan.

Connect with Shifting Roots On. . .

  • Email
  • Facebook
  • Instagram
  • Pinterest
  • Twitter

Find What You’re Looking For. . .

Privacy Policy

I love seeing the world through this loving boy’ I love seeing the world through this loving boy’s eyes.  Honestly, I’ve been so sick that I wasn’t really in the mood to “do Valentines Day” but there was this sweet little voice going on about how excited he was for today and how much he loves his family and I just couldn’t resist.  So whether you’re on your own, part of a couple, or in the thick of life-with-littles craziness, Happy Valentines Day!

#valentinesday2020 #mylittlevalentine #boymomlife #lifewithlittles
How do you pass a cold -28 day? By planning your How do you pass a cold -28 day?  By planning your garden, of course!  Today in my stories I’ll be going through the steps I take to start planning everything out.  I’m curious, do you start planning now or wait until the last minute?

P.S.  want your own copy of this planner?  This is the newly updated paid version and it’s on sale by itself from now until Sunday for only $5.  If you’re from Canada, use the code CANADA to make $5 USD be closer to $5 CAD.  Head over to the link in my bio to get yours.

#gardenplanning #gardenplanner #gardenersofinstagram #gardenersofig #organizedlife #organizedliving #wintergardening
Curious about growing lettuce indoors? My experim Curious about growing lettuce indoors?  My experiment is a success so far, although it’s still going to be awhile before I’m eating another salad off of them.

Okay, so maybe a little rant today.  I think sometimes in the gardening space we’re guilty of making things seem easier than they are.  Myself included.  This lettuce project is a case in point.

Was it easy?  Yes.  But will it provide me with endless salads all winter long? Nope.  Or at least not at this scale.  I’m going to estimate that I’d need at least 15 plants this size, especially since it’s winter and everything just grows slower.  And I’m the only person in my family who really eats salad.

In conclusion, this is a fun project to pass the winter, and not a truly sustainable source of lettuce.

Thoughts?

#growinglettuce #eatwhatyougrow #growwhatyoueat #wintergardening #indoorgardening #plantproject #sustainablefood #gardenersofinstagram #gardenerslife #northerngardening
Part of the mystery of seed starting is knowing ex Part of the mystery of seed starting is knowing exactly what to start when.  Every two weeks, I'll be posting these handy guides so you have enough time to order your seeds and be ready to plant when it's time for your area.  To find out when these veggies, herbs, and flowers need to be started where you live. . . ⁠
⁠
1. Search out your area's last frost date.  There are plenty of calculators on the Internet.⁠
⁠
2. Count backwards 8 weeks from that date.⁠
⁠
3. Start these seeds when that date hits.⁠
⁠
If you follow me because we're in similar zones--don't panic, it's not time yet!! I won't be starting my 10 week seeds for another two weeks, and even that is slightly on the early side. (I'm starting everything a bit early so I can hopefully plant it out before baby gets here--I won't be physically able to do it after.) I like posting the info early for followers in warmer zones and so you can save it and still have time to order/buy seeds & supplies.⁠
⁠
Which one of these are you most excited to start?⁠
⁠
#seedstarting #seedlings #homegardener #northerngardener #homesteading #urbandhomesteading #homesteadingskills #gardenlife #gardenlifestyle #startingseeds
Eeeek!!! My luffa seedlings are up!! I’m growing Eeeek!!! My luffa seedlings are up!! I’m growing the whole seed packet in hopes that a few of these little luffa babies will provide me with zero waste sponges that I can use for home cleaning, and as an exfoliant in home made beauty products.

The catch?

These plants are notoriously hard to grow, especially when you live somewhere cold with a really cold growing season—and if they get a hint of frost on them they turn to mush and all my hard work is ruined.

Gulp.

But gardeners are born optimists, so I’m giving it a shot—because you miss 100% of the shots you don’t take.

P.S. if you’re trying luffa in zone 3 like me, just basically ignore all the directions on the seed packet.  Start them immediately (two weeks ago would have been ideal) and follow along because I’ll show you exactly what to do and when.  I’ll be popping these under a grow light once the sun goes down.

#luffagourd #luffa #loofah #seedlings #seedstarting #northerngardening #northerngardener #gardenersofinstagram #gardenersofig #mygardenthismonth #gardenlife #canadiangardening
This weekend I took a big leap of faith. I came t This weekend I took a big leap of faith.  I came to New York to meet with other content creators/business owners to dig deep into what we do and create a strategy around our messaging.  I don’t even know how to properly describe what all went down, but is was incredibly life changing and I really feel connected to this tribe of women who are committed to playing to win and being the people our businesses need us to be.  I’m so excited to share what I’ve planned for my business with you in the coming months.

#playtowin #gardenblogger #businessowner #wahmlife
Is there such a thing as a no-fail houseplant? I Is there such a thing as a no-fail houseplant?  I think the Sansevera or Snake Plant or Mother-in-law’s tongue comes close.  Sure, it might be the vanilla of the plant-loving world, but it is so good for so many situations!⁠
⁠
It can handle you forgetting to water it, low light, or bright light.  It is somewhat forgiving if you are an over-waterer. ⁠
⁠
I’ve had this one for 2 or 3 years now and I keep getting rewarded with more spikes.⁠
⁠
Plant lovers, is there another houseplant you think would be perfect for beginners?⁠
⁠
#crazyplantlady #houseplantsofig #houseplantsofinstagram #snakeplant #houseplantlove
Load More… Follow on Instagram

Theme Design By Studio Mommy · Copyright © 2021

Copyright © 2021 · Beyond Madison Theme on Genesis Framework · WordPress · Log in