SHIFTING ROOTS

home, garden, food, and prairie lifestyle

  • About
    • Contact
    • Work With Me
    • Features
    • Privacy Policy
  • Blog
  • Gardening
    • How to Start a Garden: Especially if you’re in Zone 3 or Zone 2
    • Seed Starting
    • Vegetable Gardening
    • Perennials
    • Cut Flowers
    • Small Space Gardening
  • Recipes
    • Canning
    • Preserving
    • Prairie Fruits Cookbook
    • The Best Pumpkin Recipes
    • How to Make a Tempting Christmas Cookie Tray (Plus Recipes!)
  • Popular Posts
  • E-Books
    • Pretty & Practical Garden Planner
    • Cut Flowers Made Simple
    • Constant Colour Perennial Garden
    • Small Garden, Big Harvest
    • Growing Roots Online Gardening Course
    • Frost Proof Flower Garden
    • Bouquets Made Beautiful
    • Savvy Seed Saving Annual Cut flowers
    • Prairie Fruits Cookbook
    • Online Gardening Consultations
  • Seasons
    • Christmas

Avoid These 8 Mistakes for a Better Vegetable Container Garden

March 4, 2020

This year I had visions of a beautiful container garden filled with vegetables on my back deck.  I would make it interesting by adding flowers to some of the pots and create a space that was both beautiful and edible.  However, my dreams and reality did not meet.  Here’s the mistakes I made and how you can learn from them.

Really quick gardening disclaimer: I garden in zone 3b in Saskatchewan, Canada, and as such, my gardening advice is best suited to the Canadian Prairies.  While I try to make my gardening tips applicable to as many locations as possible, it is impossible to be 100% relevant to every single zone in North America and beyond.  Thanks for understanding!

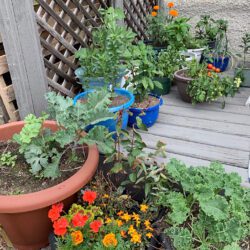
Second disclaimer: Nobody really wants to see pictures of practically dead plants.  The pictures here are of my pots when they last looked good, around the mid-point of the growing season.  They went downhill shortly after.

Do you dream of having a container vegetable garden on your patio, balcony, or other small space?  Gardening in pots can be tricky for beginners--here's 8 mistakes you'll want to avoid. #gardening #containergardening #pots #vegetables #vegetablegardening #beginners #plantcare
[Read more…]
Kristen Raney

Kristen is a former farm kid turned urban gardener who owns the popular gardening website, Shifting Roots.  She is obsessed with growing flowers and pushing the limits of what can be grown in her zone 3b garden.  She also loves to grow tomatoes, but oddly enough, dislikes eating them raw.

www.shiftingroots.com

13 Comments
Filed Under: Gardening, Vegetables Tagged: beginner gardener, beginner gardening, container gardening, containers, growing vegetables, pots, small space garden, vegetable garden, vegetable gardening, Vegetables

Want to Seed Start But Have No Space? This DIY Seed Starting Rack for Your Window is the Answer!

January 10, 2020

Do you dream of a huge set of seed starting shelves filled to the brim with plants under multiple sets of grow lights? You could save money, start your own seeds, and stick it to Old Man Winter.

But the reality is, there’s just no space in your small home!! Or you have one decent window to seed start, but there’s barely even a ledge. What do you do now? Resign yourself to a life of expensive starters?

Not you my friend.

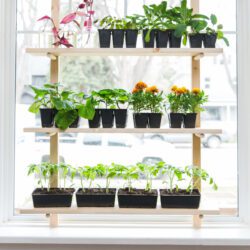
You’re going to DIY yourself a seed starting shelf in your window frame. (Or order one from us, more details at the end!)

This post contains affiliate links, which means if you purchase anything I earn a small commission at no extra cost to you. You can read more about it in my Privacy Policy. Thanks for supporting Shifting Roots!

Seed Starting Shelves without Grow Lights!?!

Yes, it is possible!

This design fits right into your window frame. All you need is a minimum 1 1/4″ window ledge and a South-facing window. West and East facing windows can work too, but heat loving vegetables will not be as successful.

Grab the listed supplies, set aside an afternoon, and you’ll have your own DIY seed starting rack in your window before you know it!

Step One: Measure the Window

Measure the length and width of the window you plan on installing the shelf in. Make sure that your vertical measurement is straight!!

Materials and Tools

The dimensions in the following list are based on the windows in our house. You will need more or less wood depending on the height and width of your windows.

  • Measuring Tape
  • Drill
  • 3/4″ Drill bit
  • Circular Saw or Hand Saw with a Mitre Box
  • 3/4″ Wooden dowel
  • 1×6 Shelving board
  • 2×2 board
  • Wooden shims
  • Hammer, for tapping the rack in place.
  • Safety glasses
  • 80 Grit Sand paper
  • Optional: Wood Glue

Cut the 2×2 board(s) just short of the height measurement of the window, so you have 2 same-sized pieces.

Determine where you want the shelves to be on the 2×2 pieces, starting from the bottom up. Leave at least 12″ between shelves and the top of the window to allow room for the plants to grow.

Mark the spots on the 2×2, making sure both pieces are marked at the same height.

Still planning out your garden? Get my free garden planner below, then head over to this post to find out how to garden plan without overwhelm.

Plan the Perfect Garden

Get your free Garden Planner and worksheets and start creating the garden of your dreams.

Success! Now check your email to confirm your subscription.

There was an error submitting your subscription. Please try again.

We won't send you spam. Unsubscribe at any time. Powered by ConvertKit

Drill 3/4″ holes through the 2×2’s at those marks. (Remember the shelf sits on top of the dowels–adjust your height accordingly.) To avoid tear out, drill partway through on one side until you see the tip of the drill bit. Turn the wood over and drill on the other side.

Cut the dowel into 6 1/4″ pieces, one for each hole. We made six holes for 3 shelves, but you may need more or less, depending on the size of your window.

Cut the shelves to the width you’d like to fit inside your window.

If your window is wider than 3 feet and you’d like the shelves to span the full width of the window, you should build a third support. It is tricky to make the shelf level with a third support, so we don’t recommend going wider than 3 feet if you’re a beginner woodworker.

Sand all edges of the pieces to get rid of any splinters or sharp corners.

Starting your seeds without a grow light? Here’s how to do it.

Assembly Instructions

Fit the dowels into the holes, making them all flush with the back side.

Place wooden shim on top of window. Tap the vertical supports into place with a hammer, wedging the support in place. Tap another wedge in the other side to fully secure it. Repeat the process for the other support.

Place the shelf on top of the dowels.

We have not provided any instructions for securing the shelves or dowels, as the intention with this project is that it is totally removable and folds up into as little space as possible at the end of the growing season. If you have pets or kids who would likely get into shelf, you can secure the dowels with wood glue, and screw the shelves in place.

Finally, add your seed starting containers and enjoy your new shelf!

A quick disclaimer: Please use common sense and do not overload your shelf!! While it’s designed to be as stable as possible, only use light-weight containers for your seedlings. Place plants starting in the centre of each shelf and then at the ends to avoid tipping. (Unless you have chosen to screw your shelves in place.)

There’s another way to start seeds when you have no space and light in your house.. . here’s how.

Wish you could seed start indoors, but don't have room for big shelves or grow lights?  If you have a south or west facing window, this removable DIY seed starting rack is the answer!  Build your own shelves according to your window's dimensions and easily remove the whole thing at the end of Spring!  Perfect for your homemade seed starting trays. #seedstarting #DIY

It’s still too early to start most of my seeds, so all I currently have on it is my peppers, artichokes, a couple of vines I’m propagating, and some of my small succulent planters.

If you’d like to know more about starting seeds from your window, you’ll love this guide.

Then head over to this post about where to buy your seeds online.

Wish you could seed start indoors, but don't have room for big shelves or grow lights?  If you have a south or west facing window, this removable DIY seed starting rack is the answer!  Build your own shelves according to your window's dimensions and easily remove the whole thing at the end of Spring!  Perfect for your homemade seed starting trays. #seedstarting #DIY

So, what do you think? Would you make something like this?

If you’re local to Saskatoon, SK, Canada, the Hermit is taking orders for these seed starting racks. Email [email protected] to get on the list of pre-orders.

Kristen Raney

Kristen is a former farm kid turned urban gardener who owns the popular gardening website, Shifting Roots.  She is obsessed with growing flowers and pushing the limits of what can be grown in her zone 3b garden.  She also loves to grow tomatoes, but oddly enough, dislikes eating them raw.

www.shiftingroots.com

2 Comments
Filed Under: Uncategorised Tagged: DIY, seed starting, small space, small space garden

Create this Relaxing Garden Room Entirely with Container Gardening

December 26, 2019

Do you ever wish you had your own private garden oasis to escape to, but you don’t have a lot of space to work with? Even if you only have a patio or small deck available to you, I can show you how to create your own garden room entirely with container gardening and vertical gardening techniques.

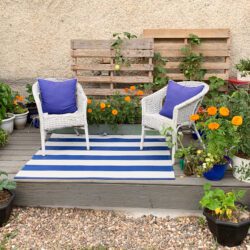
In 2019, I grew this beautiful small space garden on the deck in my backyard. It soon became one of my favourite spots and I loved having my morning coffee out there. Since it was right by the house, it was also very convenient to grab a few herbs or vegetables, or snip a flower or two to make the table pretty.

It took a few tries over the years to get this space just right. Head on over to this post about all the mistakes I made along the way and how you can avoid them.

A quick disclaimer before we get into the post. I garden in zone 3 in Saskatoon, Saskatchewan, so your results might differ if you live in a different climate.

1. Start with a Colour Palate

You don’t have to have a colour palate, but I like how my my blue pots and accessories contrast against all my orange flowers. If you want to steal the look, you can see my inspiration here.

Next year, I’m going to keep my blue, but try for more pinks and purples flower-wise for more subdued look and see what I like better.

I also think an all-white palate would be beautiful for those who like a more neutral look or spend most of your time outdoors in the evening.

2. Provide Natural Mosquito Protection

Nothing kills the fun of an outdoor garden room than being plagued by mosquitos. That’s why my number one priority every year is to plant at least one pot of citronella or citronella geraniums. That way, when I come to the garden, I can immediately run my hands over the plant and get natural protection for my face and any other exposed parts.

3. Plant a Mix of Herbs, Companion Flowers, and Vegetables

An outdoor garden space should be both practical and beautiful. With a good mix of herbs, flowers, and vegetables, there’s always something to pick once the garden gets established.

This year I planted leafy greens, pole beans, cucumbers, peppers, cherry tomatoes, basil, thyme, sage, rosemary, mint, patio-sized spaghetti squash, onions, marigolds, zinnias, snapdragons, and nasturtiums.

What should you plant? Whatever you actually like to eat, plus a new variety or two to expand your horizons.

4. Choose Small-Scale Varieties When Possible

Over the years I’ve found that it’s important to choose varieties that work better in pots–cherry tomatoes instead of heirloom tomatoes, container-sized squash, and pole beans instead of bush beans. Both heirloom tomatoes and bush beans have worked for me in containers, the yields just haven’t been very good.

Kale grows well in pots, but the way I plant it, it remains miniature sized. I like to put 4 per 14 inch pot, but ideally I should only put one for bigger leaves. If you like baby kale, plant it like I do. If you want bigger leaves, plant only one in the pot.

Most seed catalogues and seed packets will state if a variety is suitable for container gardening. If you see a vegetable packet that says it grows well in pots–snap it up!

I also haven’t had a lot of luck growing successful root vegetables, but I know it can be done and I’m going to keep trying.

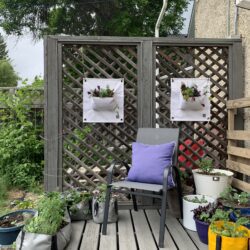
Whatever you grow, lead your vining plants like pole beans, squash, and cucumbers up trellises or pallets. I’m fortunate enough to have a trellis already attached to the deck on one side, so I lead my beans up there.

5. Consider Where the Rain Falls. . .Or Not.

One of my biggest mistakes the first time I tried to grow a container vegetable garden like this was putting my plants too close against the house. The rain usually didn’t get the plants that were under the overhang, and they also tended to get hotter during the hottest afternoon sun. This lead to struggling and eventually dead plants as the summer progressed.

This year, I kept everything at least 1 foot/30 centimetres away from the house and my plants did much better.

6. Water Daily

Okay, so you might not have to water daily all the time. However, container gardens usually require a more diligent watering schedule that regular in-the-ground gardens. You can combat the need for constant watering by surrounding your plants with mulch, but during the hottest days you might need to water your plants in both the morning and evenings.

This year, I actually had the opposite problem, in which it rained so hard for so many days that any of my pots without a drainage hole were completely saturated and had standing water in them. I had never experienced this before, as the Canadian Prairies tend to be more prone to drought.

Next summer I’ll remedy my pots. However, I was forced to take as much of the standing water away and I didn’t need to water my pots for over two weeks.

P.S. Speaking of pots, if you like my blue pots in the pictures, here’s how I decorated them and step-by-step directions so you can get the look.

7. Use Started Plants

Can you grow vegetables, flowers, and herbs directly from seed in a pot? Sure. But in my experience, they take forever to grow and my birds end up eating most if not all of the seeds. If it’s a vegetable or herb that can be started indoors, you’ll have more success with a starter plant.

One of my favourite vegetables to plant in containers are Hungarian Wax peppers. I’ve always had great results, even if I’ve neglected them a little bit.

On a side note, this was also the year that I really perfected my pepper growing process. Get all my secrets here!

I also am a huge fan of Crackerjack marigolds. They’re the really tall ones (instead of container sized) and I like them because they provide a bold hit of colour and can be used as both a companion flower and a cut flower.

8. Bring Your Houseplants Outdoors

Most houseplants love to spend a summer outdoors, soaking up more sunlight and rainwater. I brought my lemon tree outdoors (pictured near the side below) and it finally grew three decent-sized lemons. I garden in zone 3, so it is a bit of a struggle to get a lemon tree thriving in my area, but it can be done!

I personally don’t bring out my shade-loving plants for the summer. I’m sure you could, as long as they’re in a shady spot, but my backyard doesn’t have any consistent shade to put them in.

By bringing your houseplants outdoors, you instantly add an extra layer to your garden space without spending any extra money. Just be sure to harden them off at the start of the season, just like you would any other plant. Get more details on the hardening off process here.

9. Head to Your Garden Room Often and Enjoy.

I’ll never forget the moment I was sitting in my garden room one morning, drinking coffee, and looking out into my yard. For the first time in 4 years, I loved what I saw, and it brought me a deep happiness.

My garden room became a place where I could go to unwind, and it was my go-to place to entertain the baby in the grumpy hour before bedtime. She wasn’t mobile yet, so I could safely leave her on the deck with a few vegetables or edible flowers for her to play with and do a bit of yard work nearby. If you have a mobile baby or toddlers, this will probably not work.

Finally, one last surprise I experienced in the container garden this year was how well tall cut flowers grew in pots. I had no problem with cut flower-sized marigolds, snapdragons, and zinnias. This summer I’m going to experiment more to see how many other typical cut flowers can be grown in pots.

Looking for more help with your cut flower garden? Here’s the best perennials and best annuals to plant.

So that’s my little garden room! Will you grow a container garden in your small space? Any tips or tricks we should know about? (Just remember to include your growing zone or approximate location in the comments for context.)

Pin this for later!

Kristen Raney

Kristen is a former farm kid turned urban gardener who owns the popular gardening website, Shifting Roots.  She is obsessed with growing flowers and pushing the limits of what can be grown in her zone 3b garden.  She also loves to grow tomatoes, but oddly enough, dislikes eating them raw.

www.shiftingroots.com

1 Comment
Filed Under: Uncategorised Tagged: container gardening, small space, small space garden, vegetable gardening

Grow roots with us

  • Email
  • Facebook
  • Instagram
  • Pinterest
  • Twitter
  • YouTube

Welcome!

Hi, I'm Kristen and I help new gardeners learn to grow their own vegetables and beautify their yards. I also share recipes that use all that delicious garden produce. Grab a coffee (and your gardening gloves) and join me for gardening tips, simple recipes, and the occasional DIY, all from the lovely city of Saskatoon, Saskatchewan.

P.S. First time gardener? You'll want to download the quick start gardening guide below!

Recent Posts

  • How to Grow Eucalyptus for Cut Flowers (Even in a Short Growing Season!)
  • 26 Best Flowers to Grow for Dried Flower Arrangements
  • 17 Perennial Flowers That Love Shade
  • How to Design a Cut Flower Garden in Raised Beds
  • How to Start a Cut Flower Garden

Welcome!

Hi, I’m Kristen and I help new gardeners learn to grow their own vegetables and beautify their yards. I also share recipes that use all that delicious garden produce. Grab a coffee (and your gardening gloves) and join me for gardening tips, simple recipes, and the occasional DIY, all from the lovely city of Saskatoon, Saskatchewan.

Connect with Shifting Roots On. . .

  • Email
  • Facebook
  • Instagram
  • Pinterest
  • Twitter

Find What You’re Looking For. . .

Privacy Policy

I love seeing the world through this loving boy’ I love seeing the world through this loving boy’s eyes.  Honestly, I’ve been so sick that I wasn’t really in the mood to “do Valentines Day” but there was this sweet little voice going on about how excited he was for today and how much he loves his family and I just couldn’t resist.  So whether you’re on your own, part of a couple, or in the thick of life-with-littles craziness, Happy Valentines Day!

#valentinesday2020 #mylittlevalentine #boymomlife #lifewithlittles
How do you pass a cold -28 day? By planning your How do you pass a cold -28 day?  By planning your garden, of course!  Today in my stories I’ll be going through the steps I take to start planning everything out.  I’m curious, do you start planning now or wait until the last minute?

P.S.  want your own copy of this planner?  This is the newly updated paid version and it’s on sale by itself from now until Sunday for only $5.  If you’re from Canada, use the code CANADA to make $5 USD be closer to $5 CAD.  Head over to the link in my bio to get yours.

#gardenplanning #gardenplanner #gardenersofinstagram #gardenersofig #organizedlife #organizedliving #wintergardening
Curious about growing lettuce indoors? My experim Curious about growing lettuce indoors?  My experiment is a success so far, although it’s still going to be awhile before I’m eating another salad off of them.

Okay, so maybe a little rant today.  I think sometimes in the gardening space we’re guilty of making things seem easier than they are.  Myself included.  This lettuce project is a case in point.

Was it easy?  Yes.  But will it provide me with endless salads all winter long? Nope.  Or at least not at this scale.  I’m going to estimate that I’d need at least 15 plants this size, especially since it’s winter and everything just grows slower.  And I’m the only person in my family who really eats salad.

In conclusion, this is a fun project to pass the winter, and not a truly sustainable source of lettuce.

Thoughts?

#growinglettuce #eatwhatyougrow #growwhatyoueat #wintergardening #indoorgardening #plantproject #sustainablefood #gardenersofinstagram #gardenerslife #northerngardening
Part of the mystery of seed starting is knowing ex Part of the mystery of seed starting is knowing exactly what to start when.  Every two weeks, I'll be posting these handy guides so you have enough time to order your seeds and be ready to plant when it's time for your area.  To find out when these veggies, herbs, and flowers need to be started where you live. . . ⁠
⁠
1. Search out your area's last frost date.  There are plenty of calculators on the Internet.⁠
⁠
2. Count backwards 8 weeks from that date.⁠
⁠
3. Start these seeds when that date hits.⁠
⁠
If you follow me because we're in similar zones--don't panic, it's not time yet!! I won't be starting my 10 week seeds for another two weeks, and even that is slightly on the early side. (I'm starting everything a bit early so I can hopefully plant it out before baby gets here--I won't be physically able to do it after.) I like posting the info early for followers in warmer zones and so you can save it and still have time to order/buy seeds & supplies.⁠
⁠
Which one of these are you most excited to start?⁠
⁠
#seedstarting #seedlings #homegardener #northerngardener #homesteading #urbandhomesteading #homesteadingskills #gardenlife #gardenlifestyle #startingseeds
Eeeek!!! My luffa seedlings are up!! I’m growing Eeeek!!! My luffa seedlings are up!! I’m growing the whole seed packet in hopes that a few of these little luffa babies will provide me with zero waste sponges that I can use for home cleaning, and as an exfoliant in home made beauty products.

The catch?

These plants are notoriously hard to grow, especially when you live somewhere cold with a really cold growing season—and if they get a hint of frost on them they turn to mush and all my hard work is ruined.

Gulp.

But gardeners are born optimists, so I’m giving it a shot—because you miss 100% of the shots you don’t take.

P.S. if you’re trying luffa in zone 3 like me, just basically ignore all the directions on the seed packet.  Start them immediately (two weeks ago would have been ideal) and follow along because I’ll show you exactly what to do and when.  I’ll be popping these under a grow light once the sun goes down.

#luffagourd #luffa #loofah #seedlings #seedstarting #northerngardening #northerngardener #gardenersofinstagram #gardenersofig #mygardenthismonth #gardenlife #canadiangardening
This weekend I took a big leap of faith. I came t This weekend I took a big leap of faith.  I came to New York to meet with other content creators/business owners to dig deep into what we do and create a strategy around our messaging.  I don’t even know how to properly describe what all went down, but is was incredibly life changing and I really feel connected to this tribe of women who are committed to playing to win and being the people our businesses need us to be.  I’m so excited to share what I’ve planned for my business with you in the coming months.

#playtowin #gardenblogger #businessowner #wahmlife
Is there such a thing as a no-fail houseplant? I Is there such a thing as a no-fail houseplant?  I think the Sansevera or Snake Plant or Mother-in-law’s tongue comes close.  Sure, it might be the vanilla of the plant-loving world, but it is so good for so many situations!⁠
⁠
It can handle you forgetting to water it, low light, or bright light.  It is somewhat forgiving if you are an over-waterer. ⁠
⁠
I’ve had this one for 2 or 3 years now and I keep getting rewarded with more spikes.⁠
⁠
Plant lovers, is there another houseplant you think would be perfect for beginners?⁠
⁠
#crazyplantlady #houseplantsofig #houseplantsofinstagram #snakeplant #houseplantlove
Load More… Follow on Instagram

Theme Design By Studio Mommy · Copyright © 2021

Copyright © 2021 · Beyond Madison Theme on Genesis Framework · WordPress · Log in