SHIFTING ROOTS

home, garden, food, and prairie lifestyle

  • About
    • Contact
    • Work With Me
    • Features
    • Privacy Policy
  • Blog
  • Gardening
    • How to Start a Garden: Especially if you’re in Zone 3 or Zone 2
    • Seed Starting
    • Vegetable Gardening
    • Perennials
    • Cut Flowers
    • Small Space Gardening
  • Recipes
    • Canning
    • Preserving
    • Prairie Fruits Cookbook
    • The Best Pumpkin Recipes
    • How to Make a Tempting Christmas Cookie Tray (Plus Recipes!)
  • Popular Posts
  • E-Books
    • Pretty & Practical Garden Planner
    • Cut Flowers Made Simple
    • Constant Colour Perennial Garden
    • Small Garden, Big Harvest
    • Growing Roots Online Gardening Course
    • Frost Proof Flower Garden
    • Bouquets Made Beautiful
    • Savvy Seed Saving Annual Cut flowers
    • Prairie Fruits Cookbook
    • Online Gardening Consultations
  • Seasons
    • Christmas

Simple Tips to Easily Air-Dry Fresh Herbs at Home

May 17, 2019

Do you love cooking with a wide variety of herbs in your kitchen or use them for homemade remedies? Then you know very well how expensive herbs can be. Before I got into the whole growing and drying herbs, I used to regularly buy small quantities of a variety of fresh ones—or whenever I needed it for a specific recipe. But they always went rancid fast before I used it all up. Sometimes I was able to prolong their freshness by wrapping them in a paper towel. Even the price of tiny bottles of dried organic herbs can run high.

Today I grow and dry most of my own. Because it is not only easy and much more economical, but I also get to enjoy them year round. If you are interested in how I started growing herbs then also read What I’ve Learned from my First Mini Herb Garden in zone 7b.

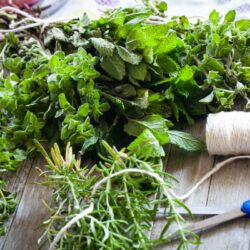
This time I want to share how to best air-dry fresh herbs whether they come from your garden or are store-bought. It still is the cheapest and most uncomplicated method to produce flavorful dry herbs that last you quite long. So, let’s start and throughout I will provide some of my experiences on how to best maintain their flavors.

Air drying is the best way to dry herbs easily.  Good to know next time I'm processing dried herbs!

Preserving Herbs

Dried versus Fresh

I love using fresh herbs more often during warmer seasons. Luckily most of them grow well throughout the summer. So I’ll often resort to drying them when I have a sizeable end-of-season harvest.  Well, a lot of it also goes to neighbors!

As someone who uses fresh and dried herbs often and interchangeably in my kitchen, I can tell you that the flavors and aroma of dried herbs are always somewhat different than fresh ones as is to be expected.

Dried herbs might lose moisture and some of its characteristics, but whatever flavors remain are much stronger. Because they are packed with a more concentrated taste, don’t expect to use them the same way as fresh ones.

Note: if you are not familiar with using dried herbs in your kitchen, know that a little goes a long way. They are three to four times stronger than fresh herbs. Sometimes people think that their dried herbs have little taste because they add it at the end of a recipe as you usually would with fresh herbs. Instead, add them at the beginning of your cooking (or during) to slowly release their aromas and build up the flavors.

A Basic Drying Process

Air-drying herbs is straightforward, easy and a pretty cheap way to preserve them. It doesn’t require much of your attention either, but the gentler you are with the whole process, the less flavor you will lose. I have noticed that if you keep the shape of the leaves and allow them to air-dry the natural way slowly, you will retain more of their essential oils which means more flavor and better quality.

It is true that herbs like oregano, thyme, rosemary, bay leaves, and sage dry well and reasonably quickly. That is because most of their leaves have a small surface area and less moisture. However, I did also have success with drying herbs that have flat softer leaves and a higher moisture content like basil, mint, and parsley.

A note on parsley: from all the herbs that I have dried, I ‘ve found that parsley retains the least of its beautiful, distinct taste and almost becomes bland. It is excellent to have on hand when you need to garnish your dishes and add some green, but I prefer fresh parsley over dried anytime.

I love growing herbs in my garden but I never know how to preserve them so they still taste good.  I can't believe how easy it is to preserve herbs with air drying--although there's more to it than meets the eye.  This post has lots of good tips. #herbs #air #drying #preserving

Preparing herbs for drying

If you have fresh store-bought herbs, gently wash and carefully pat dry them first. If you are harvesting your own, here are a couple of tips to lock in their flavors:

  1. Harvest them before the plant flowers. After doing some research and with some trial and error, I’ve learned that the oil content and taste of plants are better before they have started flowering.
  2. Try pruning them around mid-morning when the dew has dried but before it becomes too hot. I have tested this a couple of times, and it is true that herbs are more tender and fresh at the beginning of the day and therefore in better condition to prepare them for drying.
  3. Gently cut away only the best parts of the plant that you plan to dry immediately. You want to use the leaves that are in good shape and can preserve the maximum amount of flavor and oils.
  4. Shake off any excess dirt or insects outside. Then bring them in and give them a little rinse. But not too much otherwise you can strip them from their natural oils.
  5. Gently pat-dry them with a clean towel and remove as much moisture as possible. Then spread out on a large serving platter lined with kitchen or paper towels and place in a warm spot but out of any direct sunlight.

You can also use a large baking tray, wooden board or just your kitchen table if you plan to dry a lot at once. It allows the herbs to further dry up after rinsing and before working them in batches (just for about an hour.) It helps if you do this with herbs that have broad leaves such basil or mint. There is less chance that way that they mold.

Note: I have noticed that herbs from your garden preserve more of their flavor once dried than the ones you get from the store.

I love growing herbs in my garden but I never know how to preserve them so they still taste good.  I can't believe how easy it is to preserve herbs with air drying--although there's more to it than meets the eye.  This post has lots of good tips. #herbs #air #drying #preserving

Air-drying herbs

In Bundles

When you air-dry herbs in bundles, it takes about two to three weeks before they are totally dry. But it requires little to no maintenance, it is effortless to store, and it can look beautiful in your kitchen or pantry. Here is what to do:

  1. Make small bundles and tie their stems together with any twine, string or cotton thread. I avoid making large bouquets of herbs because they are harder to dry and can mold more easily.
  2. Hang upside down using (painters) tape to attach the string to the wall, a pantry closet, kitchen cabinet. Just make sure that it is in a dry and warm place, but away from sunlight.
  3. Check from time to time for signs of mold or mildew.

Note: Bouquets of dried herbs also make for a beautiful gift for friends or family!

In a large Basket

An alternative option is to place them on paper towels in a large basket and cover them with paper bags poked with some holes for lots of air circulation. Then place it on top of cupboards in your kitchen to dry there for several weeks. Check regularly and turn them around if needed. It is a more suitable method if you tend to dry smaller amounts of herbs.

Note: this is also how my grandmother would dry old bread for several days before transforming it into bread crumbs.

Air drying herbs is so easy and it preserves the flavour better for storage.

Tips on how to store dried herbs

Once dry, I crumble the herbs with clean fingers, and I discard any thick stems. It is best to store it in small individual airtight containers. I like to reuse empty store-bought dried herb bottles with tightfitting lids. I keep the jars in a cool dark place like a kitchen cabinet, pantry or drawer. It will hold between 6 to 12 months. Of course, the sooner you use them, the more flavor they have.

Because I use a lot of herbs, I often leave the dried cute bundles hanging in my pantry and cut off what I need.

There is something special about opening a jar of dried herbs from your garden or having beautiful aromatic herb bouquets hanging in your pantry! And if dried well and with a little care, their flavors are amazing.

I love growing herbs in my garden but I never know how to preserve them so they still taste good.  I can't believe how easy it is to preserve herbs with air drying--although there's more to it than meets the eye.  This post has lots of good tips. #herbs #air #drying #preserving

Have you dried herbs at home before and used a different method that works well for you? Please share it with us in the comments and let us in on your secrets!

Mariska Ramondino

I love the challenge of creating and learning new things whether that is making original healthy meals for my family in the kitchen, working on home projects or learning how to tend my garden better. If I did not live in a suburban area, I would have a flock of chickens.

www.mychefsapron.com

3 Comments
Filed Under: Uncategorised Tagged: air drying, drying, Herbs, Preserving, storage

Grow roots with us

  • Email
  • Facebook
  • Instagram
  • Pinterest
  • Twitter
  • YouTube

Welcome!

Hi, I'm Kristen and I help new gardeners learn to grow their own vegetables and beautify their yards. I also share recipes that use all that delicious garden produce. Grab a coffee (and your gardening gloves) and join me for gardening tips, simple recipes, and the occasional DIY, all from the lovely city of Saskatoon, Saskatchewan.

P.S. First time gardener? You'll want to download the quick start gardening guide below!

Recent Posts

  • How to Grow Eucalyptus for Cut Flowers (Even in a Short Growing Season!)
  • 26 Best Flowers to Grow for Dried Flower Arrangements
  • 17 Perennial Flowers That Love Shade
  • How to Design a Cut Flower Garden in Raised Beds
  • How to Start a Cut Flower Garden

Welcome!

Hi, I’m Kristen and I help new gardeners learn to grow their own vegetables and beautify their yards. I also share recipes that use all that delicious garden produce. Grab a coffee (and your gardening gloves) and join me for gardening tips, simple recipes, and the occasional DIY, all from the lovely city of Saskatoon, Saskatchewan.

Connect with Shifting Roots On. . .

  • Email
  • Facebook
  • Instagram
  • Pinterest
  • Twitter

Find What You’re Looking For. . .

Privacy Policy

Growing a luffa sponge was possibly the most chall Growing a luffa sponge was possibly the most challenging and finicky thing I've taken on so far as a gardener in zone 3.  And all I got to show for it was 3 baby loofah sponges, which are so precious to me that I can't bare to actually use them. (Kind of defeats the point, doesn't it?)⁠⠀
⁠⠀
I'll be starting mine soon, so I though I would share some of the improvements to the growing process from last year.⁠⠀
⁠⠀
1. Plant in larger containers!! I thought I used large enough ones, but I sorely underestimated how big these plants would get indoors.  Once of my readers suggested buckets, and I think this is an excellent idea.⁠⠀
⁠⠀
2. Plant only 1 plant per container.  I thought loofah's would be like a cucumber or pumpkin or other vining squash where you plant in a hill.  The containers with two plants in them did not do as well as the single seed containers.⁠⠀
⁠⠀
3. Have a string for the vine to climb.  Cutting the vine off of my window screen was not fun.⁠⠀
⁠⠀
Will you try luffas this year?⁠⠀
⁠⠀
#luffasponge #loofahsponge #luffachallenge2012 #seedstarting #wintergardening #indoorgardening⁠⠀
Got the seed starting itch? There's some things y Got the seed starting itch?  There's some things you can actually seed start now and you won't end up with crazy leggy seedlings and endless problems.  In fact, these plants require that you start now, and need to be started in zone 3 by the end of February at the absolute latest.⁠
⁠
I've already started some lisianthus and eucalyptus, and am waiting on my seed orders to start some more.⁠
⁠
If you're starting a luffa sponge, make sure you have some sort of eventual plan for the vine.  last year mine went over my fall windows before I was able to take them outdoors.⁠
⁠
P.S. I've actually never started onions from seed, so if anyone wants to chin in about their experience, feel free!
Growing eucalyptus for the first time this year? Growing eucalyptus for the first time this year?  A new post is on the blog to walk you through it.  While in theory eucalyptus is easy to grow, it's challenging in my zone 3 garden for three reasons: ⁠
⁠
➡️It needs a long time to mature⁠
➡️I have a short growing season⁠
➡️I live in a cool climate, and eucalyptus grows better when its warm.⁠
⁠
That said, you can see by this picture that it can be done!!⁠
⁠
Are you growing eucalyptus this year?
Oh friends, if any of my nice, curated photos sums Oh friends, if any of my nice, curated photos sums up how this last week went, I think it's this one.  Babies crying, trying to stay calm, outwardly looking like it's all under control, but feeling very overwhelmed.⁠
⁠
This post isn't gardening related, so feel free to scroll by if you're here only for the gardening content.⁠
⁠
Thankfully it's January, and I keep reminding myself that the Internet will not break if I don't keep to my self-imposed posting schedule.  But it doesn't make a week full of teething-and-not-sleeping baby any easier. ⁠
⁠
Felicity slept through the night for the first time ever last Monday, then proceeded to punish us with frequent wakings and terrible sleep until Saturday.  And as tough as this is in regular times, in Covid times its extra frustrating because I don't have my village.⁠
⁠
I can't just call up another Mama friend and go for coffee at her house.  I can't take my son out for a Mommy-and-Dominic date because everything he'd want to do isn't really much of an option.  There's no playgroup or play place to just drop in on.  And forget just taking everybody out to get groceries just for a change of scenery.⁠
⁠
I know people have way more serious problems than this, and I hope I don't sound whiny and entitled, it's not my intention.  Please know that I'm very grateful for my family and job and that so far we've been healthy. ⁠
⁠
A lot of you who follow me do so in part because you are also juggling life with very little people through this strange time.  I hope that in occasionally sharing my struggles, it makes you feel better about your struggles. (You're struggling too sometimes. . . right?)
Do you tend to plan out your garden to the nth deg Do you tend to plan out your garden to the nth degree, do you just wing it, or are you somewhere in-between?⁠
⁠
I tend to plan it all out, and then when I actually get out in the field, so to speak, the plan changes a little bit. ⁠
⁠
If you need a garden planner that's both pretty & practical, my garden planner is available in the ebooks section.  It's only $9 and has lots of upgrades from the previous planner.  Use code CANADA if you're Canadian to account for the exchange.⁠
⁠
P.S. You can see exactly what you're getting in the video--no surprises. ⁠
P.P.S  I get my planner bound and printed at a printing place.  Lots of people just print their own and put the sheets in a binder.
Are you gardening in containers this year? When y Are you gardening in containers this year?  When you're shopping for vegetable seeds, look for varieties that have names with words like patio, tiny, small, etc.  While lots of vegetable varieties will do fine in a container, you'll have an easier time with ones that are specifically bred for that situation.⁠
⁠
📸 by @blushbrandphotography
I'm living the pepper dream in this photo. While I'm living the pepper dream in this photo.  While these ones are a bit on the small side, who doesn't want ripe peppers in July in zone 3?!?! ⁠
⁠
Over the years I've gotten better at growing peppers, and I promise I'll spill my secrets in February when it's actually time to start them.  Until then, get yourself all or one of my four favourite varieties: ⁠
⁠
🌶️Carmen⁠
🌶️Escamillo⁠
🌶️Candy Stripe⁠
🌶️Hungarian Hot Wax⁠
⁠
Do you have a favourite pepper variety?⁠
⁠
Load More… Follow on Instagram

Theme Design By Studio Mommy · Copyright © 2021

Copyright © 2021 · Beyond Madison Theme on Genesis Framework · WordPress · Log in