SHIFTING ROOTS

home, garden, food, and prairie lifestyle

  • About
    • Contact
    • Work With Me
    • Features
    • Privacy Policy
  • Blog
  • Gardening
  • Recipes
  • Popular Posts
  • Courses

Backyard Progress 2017 and the Beginnings of Urban Gardening

June 1, 2017

Pin3
Share
Tweet
3 Shares

Last weekend was the unofficial gardening weekend in Canada (otherwise known as May Long Weekend) and our household was no exception to the trend.  However, there was one little problem. . . the wilderness we call our backyard and garden space.

I’m going to spare you the agonizing details of roto-tilling twice and removing as much weeds and grass as possible.  Let’s just say that it was overwhelming to start, but deeply satisfying to finish.

9 hours of work and a truck full of weeds hauled to the compost depot later. . .

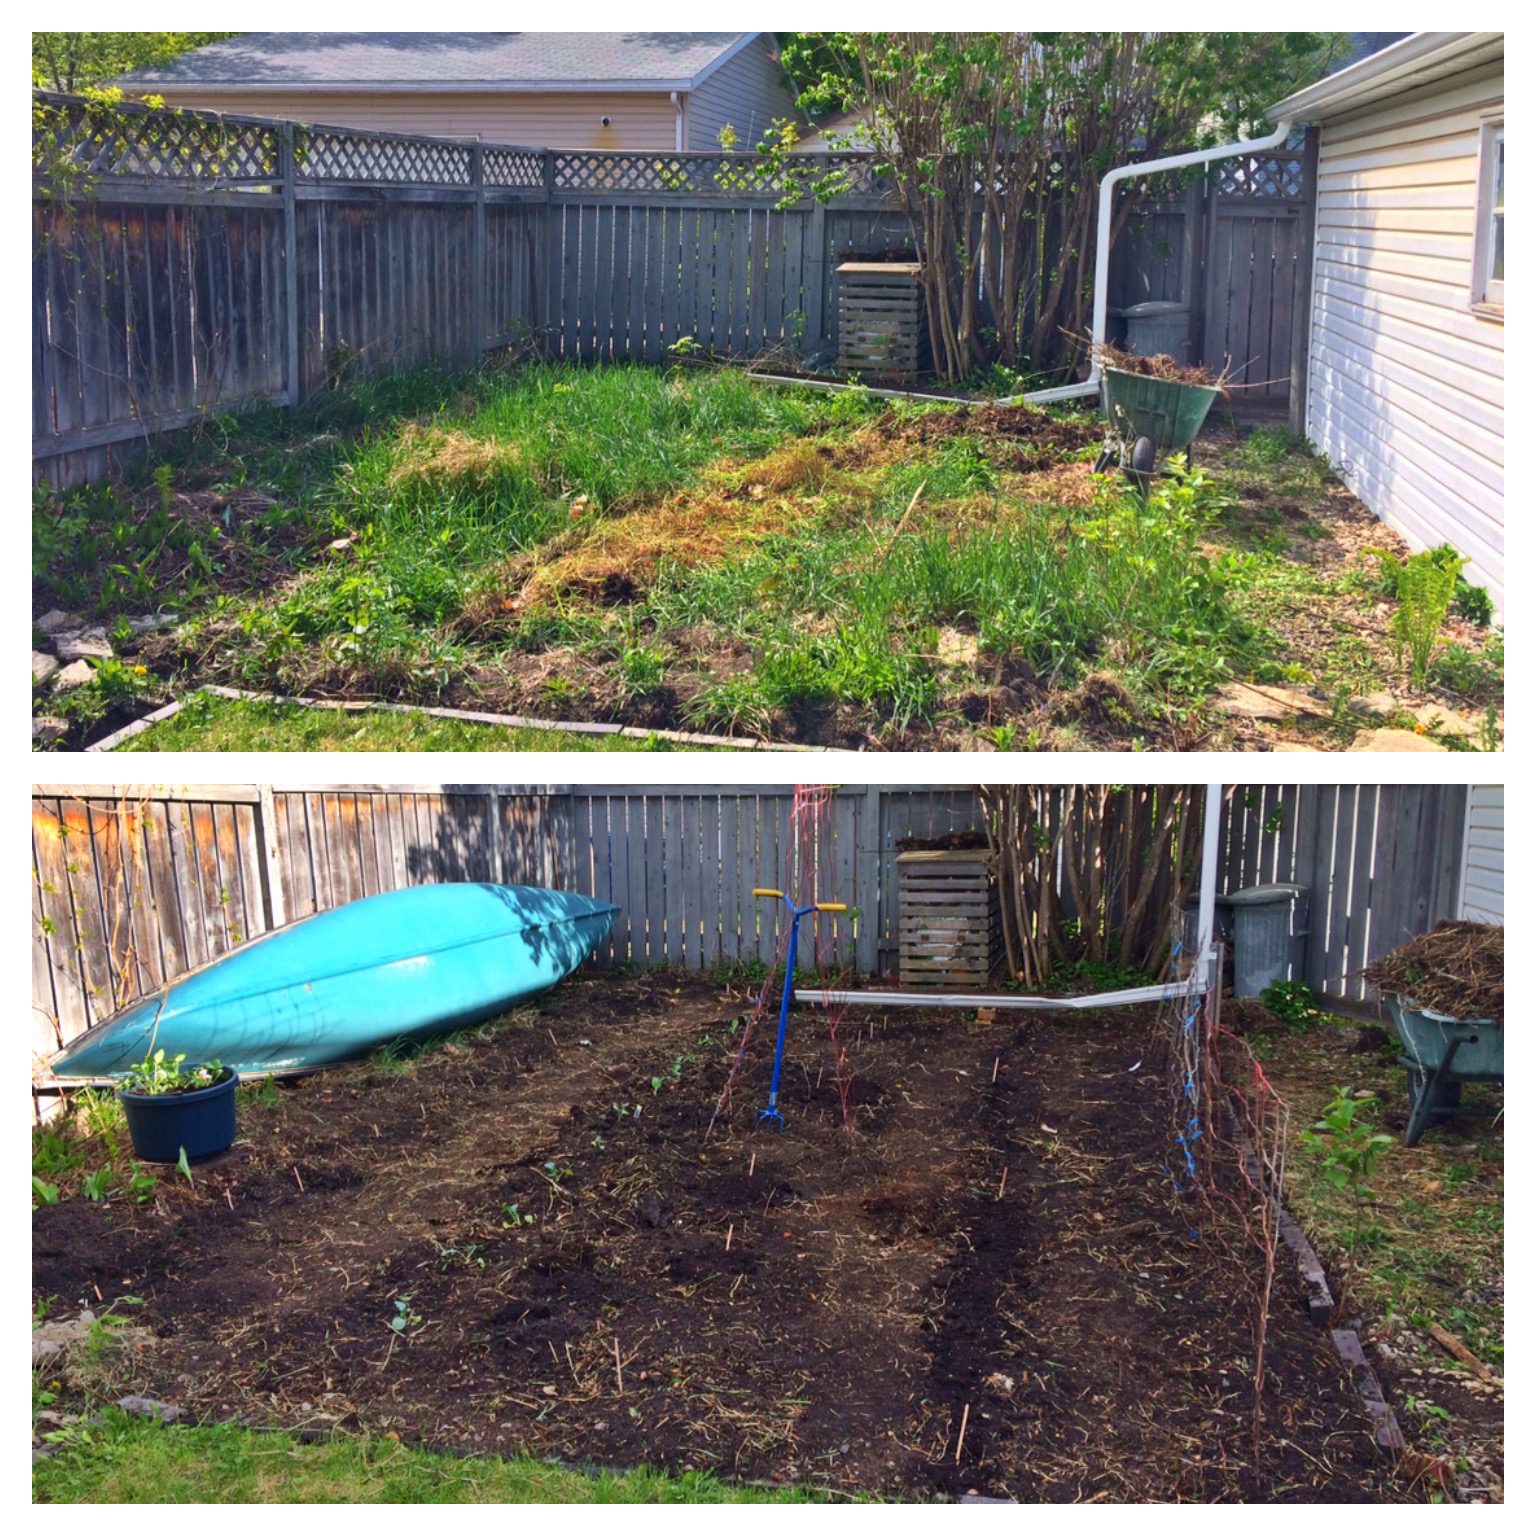
I still can’t believe that this is our yard when I look out the window.

Now that we had a garden space, we had another problem. . . not nearly enough garden space.  We have plans to expand, but for this year, we’re making do with planting among the flower beds, extra pots, and garden beds.


Related: 53 Best Perennials to Grow in Zone 3

Gardeners Worst Nightmares: 28 Perennials You’ll Regret Planting

Cold-Climate Gardening When You Literally Have No Clue


This is when it’s really awesome to have a husband who is a carpenter.  With just a few boards from Home Depot he was able to make quite a few projects.

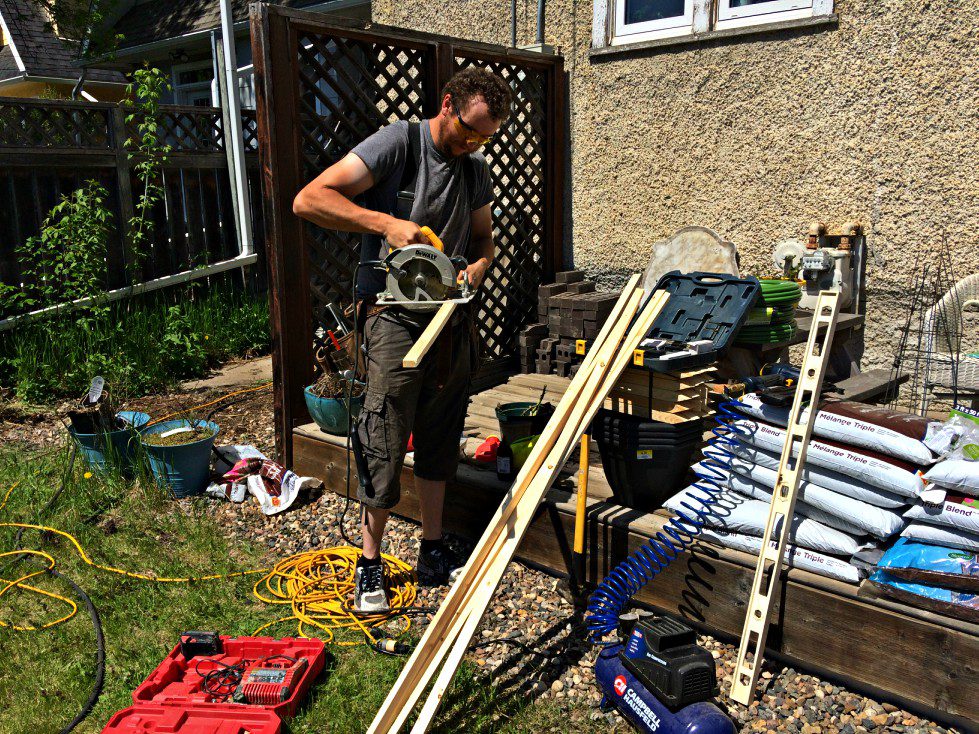
I’m always happy to do the painting if the Hermit does the making.

I’m in love with this garden trellis he fashioned from 1/2 a board and leftover construction materials.


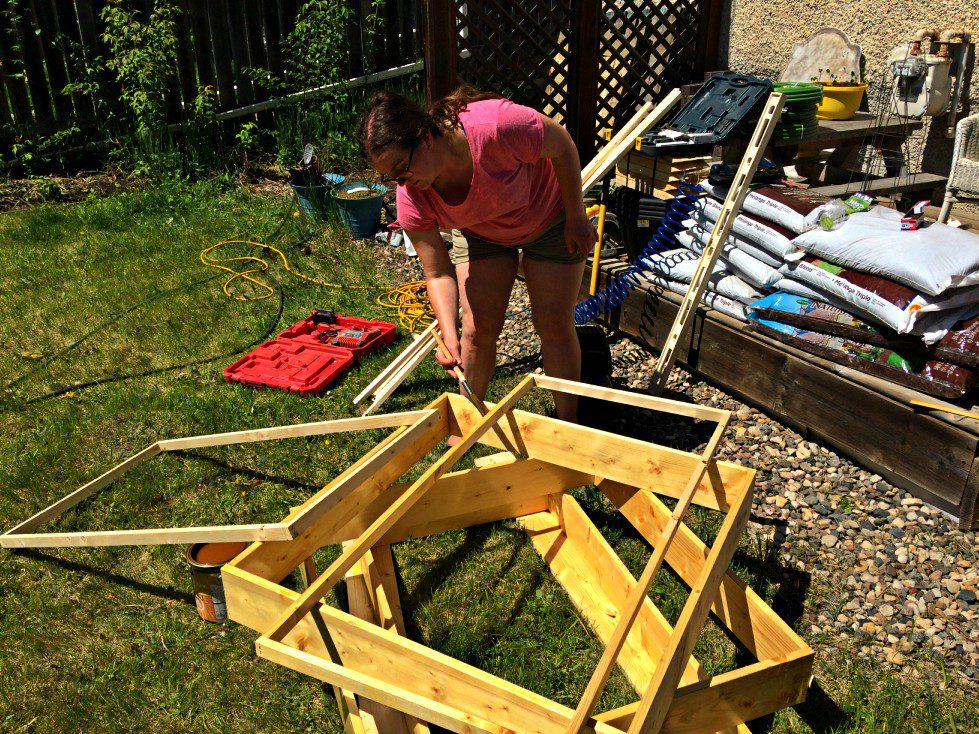
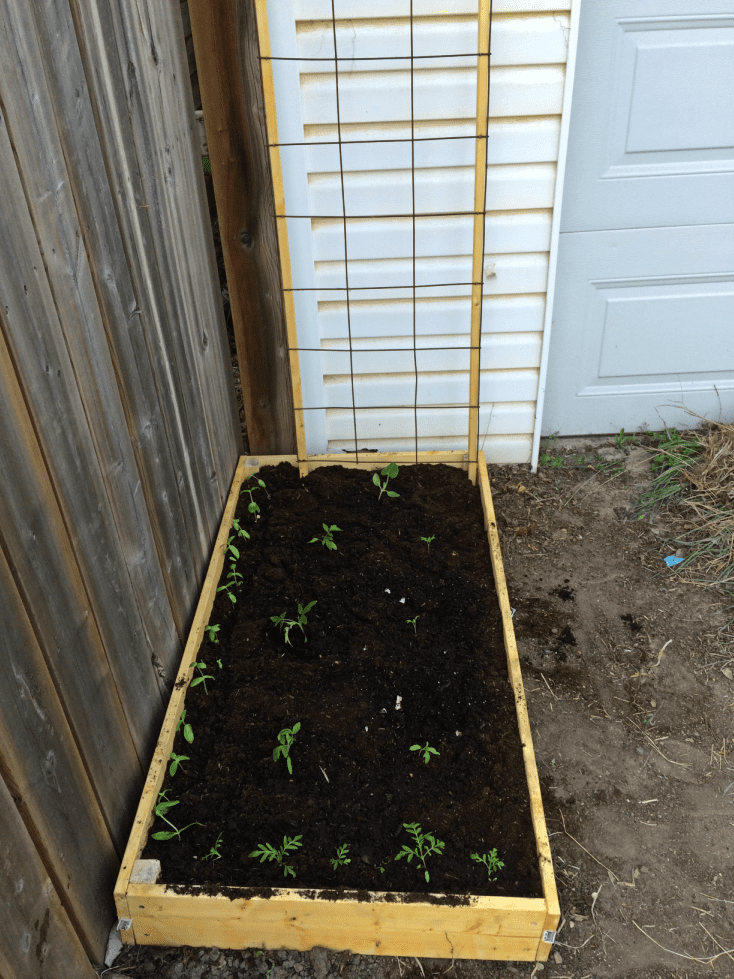
This year we’re adding 3 raised gardening beds.  I don’t know why I thought they would be so overwhelming to make, but the Hermit was able to make them in under an hour with two boards and 4 stakes.

I am a little bit nervous about having a garden bed in my alley space, but it gets good sun. I’m willing to risk people stealing the vegetables and flowers in the fall.

I love this little trellis that the hermit made me.  We’re growing pickling cucumbers on one side and slicing cucumbers on the other.  Our garden space is a combination of square foot and regular gardening.  I’m pretty sure it’s going to be a jungle in the fall.  I’m also sure that we haven’t seen the last of the grass/invasive perennials.

Related: Follow my Outdoor Living and Zone 3a Gardening Boards on Pinterest!

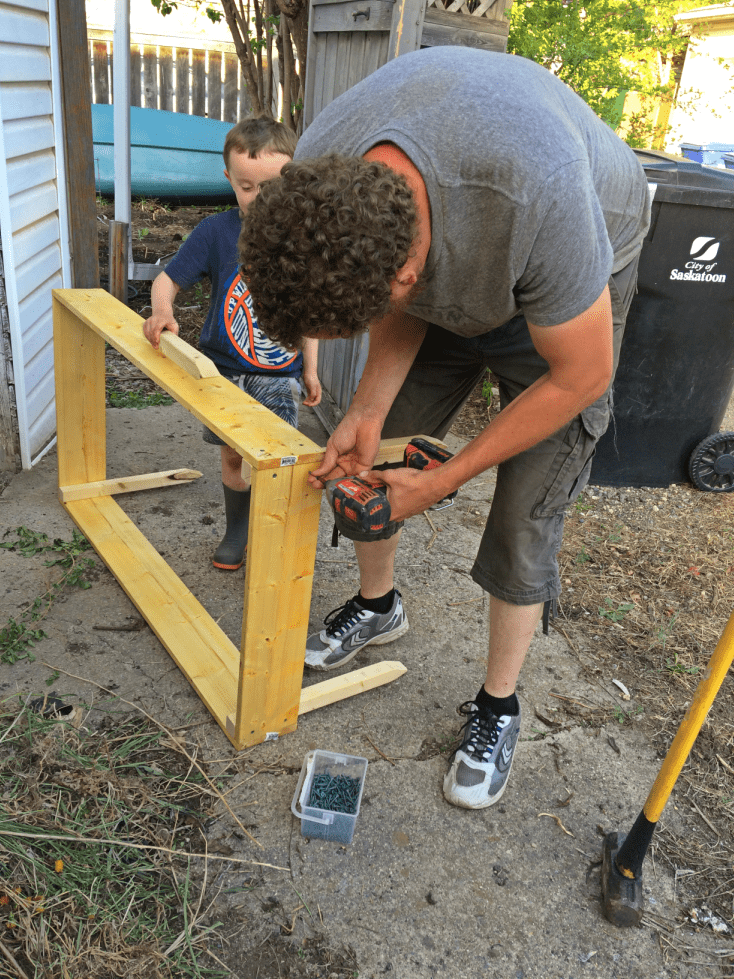
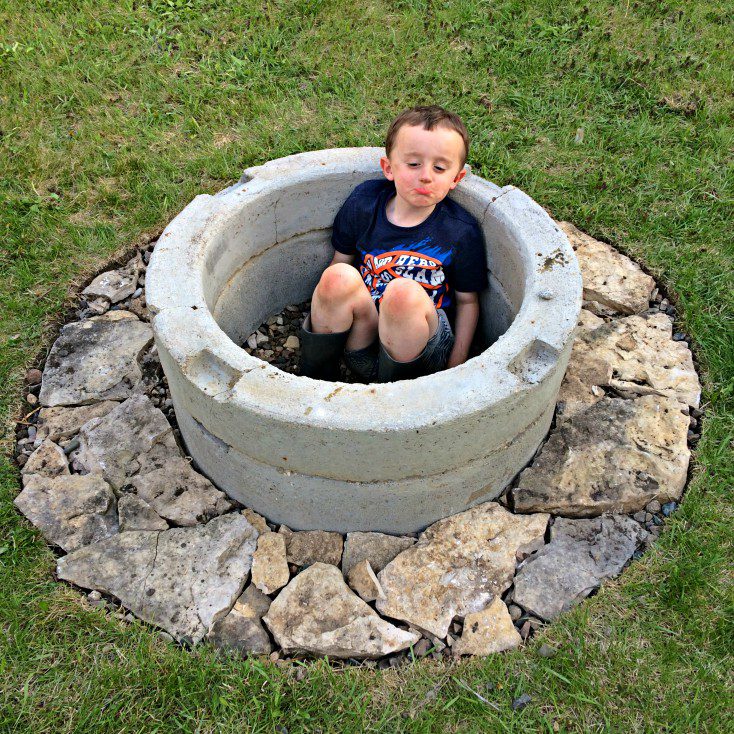
The Hermit also made a fire pit with discarded stuff from a construction site (don’t worry, he asked permission to take these) and rocks and gravel we already had in the yard.  Dominic immediately took to it and claimed it as his own.  Hopefully he’ll understand that he can’t go in there once we have a grate and actually start having fires there.

I can’t wait to finally enjoy our backyard!!

How are your backyard and gardening projects going so far?  What do you have planned?  Tell me about it in the comments!

P.S.- I share behind the scenes photos, inspiration, and bits of my life on Facebook and Instagram.  Both accounts are different, I’d love to see you there!

Want to Start a Vegetable Garden?

Screen shot 2018 04 19 at 4.23.58 pm

Learn the basics in just a few minutes, and set up your first garden in a day or less!

Get just the basics you need to start your garden this spring. I'll also email you a mini email course, helpful tips and easy garden advice, straight to your inbox.

Ready to start your garden adventure?

Success! Now check your email to confirm your subscription.

There was an error submitting your subscription. Please try again.

We won't send you spam. Unsubscribe at any time. Powered by ConvertKit
Kristen Raney

Kristen is a former farm kid turned urban gardener who owns the popular gardening website, Shifting Roots.  She is obsessed with growing flowers and pushing the limits of what can be grown in her zone 3b garden.  She also loves to grow tomatoes, but oddly enough, dislikes eating them raw.

10 Comments
Filed Under: 1929 house, DIY, Gardening, Makeover, Outdoor Life, Projects, Renovation Tagged: Backyard, DIY, firepit, Garden, garden bed, garden box, Gardening, Makeover, rototilling, urban gardening, weeding, Weeds

About Kristen Raney

Kristen is a former farm kid turned urban gardener who owns the popular gardening website, Shifting Roots.  She is obsessed with growing flowers and pushing the limits of what can be grown in her zone 3b garden.  She also loves to grow tomatoes, but oddly enough, dislikes eating them raw.

Comments

  1. Jessica Devlin Design says

    June 1, 2017 at 12:52 pm

    i'm so excited to follow along your journey! We are installing a big garden next year and storing up all the info we can
    Reply
    • Kristen Raney says

      June 1, 2017 at 4:10 pm

      Ooo! So exciting!!
      Reply
  2. Corey | The Nostalgia Diaries says

    June 1, 2017 at 1:19 pm

    I've always wanted to have my own garden. Yours is going to be so amazing!
    Reply
    • Kristen Raney says

      June 1, 2017 at 4:10 pm

      Thanks!
      Reply
  3. Rita says

    June 1, 2017 at 4:59 pm

    Awesome progress. Happy gardening
    Reply
  4. Davi says

    June 1, 2017 at 9:18 pm

    Wow, you've done a lot of work! It's going to be great just walking outside and picking your dinner!
    Reply
  5. Cheyenne says

    June 1, 2017 at 9:24 pm

    Looking good!
    Reply
  6. Kristine says

    June 2, 2017 at 6:47 am

    How cool! Man it's such a pain to rip out a full bed of weeds, but so rewarding afterwards. Can't wait to see the progress of your garden!
    Reply
  7. Trish says

    June 2, 2017 at 6:52 am

    I sometimes miss having a garden, but on the days that its 90 degrees I'm sorta glad that I don't have to be pulling weeds.. I have been doing my garden in flower pots for the past couple years... Its so much easier and not as many weeds. lol Yours is going to look awesome! :)
    Reply
    • Kristen Raney says

      June 2, 2017 at 7:01 am

      What do you plant in your containers? We don't have enough garden space so we have to do some container gardening as well.
      Reply

Leave a Reply to Davi Cancel reply

Your email address will not be published. Required fields are marked *

This site uses Akismet to reduce spam. Learn how your comment data is processed.

Grow roots with us

  • Email
  • Facebook
  • Instagram
  • Pinterest
  • Twitter
  • YouTube

Welcome!

Hi, I'm Kristen and I help new gardeners learn to grow their own vegetables and beautify their yards. I also share recipes that use all that delicious garden produce. Grab a coffee (and your gardening gloves) and join me for gardening tips, simple recipes, and the occasional DIY, all from the lovely city of Saskatoon, Saskatchewan.

P.S. First time gardener? You'll want to download the quick start gardening guide below!

Recent Posts

  • Why Won’t My Christmas Cactus Bloom? (And What to Do About it)
  • The Best Companies to Purchase Cut Flower Seeds for your Backyard Flower Farm
  • Naturally Sooth a Sore Throat and Cough now with these 6 Best Drinks and Non-Alcoholic Hot Toddies
  • Calm Your Cough with a Four-Ingredient Hot Toddy
  • 20+ Gift Ideas for the Gardener in Your Life this Christmas

Welcome!

Hi, I’m Kristen and I help new gardeners learn to grow their own vegetables and beautify their yards. I also share recipes that use all that delicious garden produce. Grab a coffee (and your gardening gloves) and join me for gardening tips, simple recipes, and the occasional DIY, all from the lovely city of Saskatoon, Saskatchewan.

Connect with Shifting Roots On. . .

  • Email
  • Facebook
  • Instagram
  • Pinterest
  • Twitter

Find What You’re Looking For. . .

Learn the Basics of Gardening in Just a Few Minutes

Screen shot 2018 04 19 at 4.23.58 pm

Gardening doesn't have to be complicated. Learn the basics in minutes, get started with your first garden in a day or less, and start your lifetime gardening adventure.

Enter your name and email address to download the Quick Start Garden Guide. You'll also get a mini-email course and weekly gardening tips and advice.

Success! Now check your email to confirm your subscription.

There was an error submitting your subscription. Please try again.

We won't send you spam. Unsubscribe at any time. Powered by ConvertKit
Instagram post 2194466595210828187_2204272319 DAY 7: 12 days of Christmas Baking⁠
⁠
So why am I showing you cinnamon buns that aren't cooked?  To prove how much delectable sauce will be at the bottom of this version. . . obviously. 😉⁠
⁠
You can make this cinnamon bun recipe the night before, then set it in the fridge to rise overnight.  Then all you have to do in the morning is heat the oven, cook the cinnamon buns while everyone is unwrapping presents, and they'll be fresh, hot, and ready by the time you're done.⁠
⁠
I also like to save a bit of the sauce and pour it over the cinnamon buns right when they come out of the oven.⁠
⁠
Ingredients:⁠
1 tbsp yeast,⁠
1 tbsp sugar,⁠
1 cup warm water,⁠
2 eggs,⁠
5 cups flour,⁠
pinch of salt,⁠
cinnamon for sprinkling,⁠
brown sugar for sprinkling,⁠
1/2 cup melted butter for rolls,⁠
1 cup cream,⁠
1 cup brown sugar,⁠
1 cup butter.⁠
⁠
Instructions:⁠
⁠
Dissolve sugar in warm water and add yeast. Let sit for ten minutes. Whisk in two eggs. Add flour one cup at a time and mix with dough hook. Add in the pinch of salt with one of your cups of flour. Do not add in the salt before the flour, as it can make the yeast less effective. Let the dough rise in a greased bowl for 60-90 minutes, or until doubled. If it is cold outside, let rise in an oven that has been warmed up and turned off.⁠
⁠
To make sauce, combine the cream, brown sugar, and butter in a sauce pan and mix until combined. Do not boil.⁠
⁠
When the dough has doubled, punch down and divide into 4 smaller balls. Roll out into a rectangle. Spread over some of the melted butter. Sprinkle brown sugar and cinnamon. Roll up and cut into pieces with a string (as shown in the photo above). Set in a greased pie plate or casserole dish and pour in some sauce. Reserve a bit of sauce for drizzling at the end. Bake in a 350 degree oven for 15-20 minutes or until light golden brown. Drizzle with reserved sauce and enjoy!⁠
⁠
#christmasbaking #holidaybaking #cinnamonbuns #theeverygirlbakes #homesteadingskills #urbanhomesteadskills #bakingaddiction #bakinglover
Instagram post 2193741846005217737_2204272319 DAY 6: 12 Days of Christmas Baking⁠
⁠
Today's recipe requires a little more time, but it's the weekend, so you can do it!  This recipe is what my family lovingly refers to as Hutzelbrot.  It's some sort of combination of 3 different German Christmas breads--if you want the full story you'll have to hop on the blog and read about the research I did.  Like many of my family recipes, it's roots are German, but it definitely got North-Americanized along the way.  Anyway.⁠
⁠
It's better than fruitcake and delicious as a breakfast bread.  I didn't really like it as a kid, but now that I'm an adult I gobble it up like there's no tomorrow.⁠
⁠
Ingredients⁠
⁠
2 1/2 cups dried fruit such as peaches, pears, apples, figs, apricots, prunes, cranberries, or currants.⁠
1/2 cup of raisins⁠
5 1/4 cups unbleached white flour⁠
1/2 cup warm water⁠
1 1/2 tbsp dry yeast⁠
1/2 tsp sugar or honey⁠
1 cup liquid from cooking fruit⁠
1 tsp cinnamon⁠
1 tsp salt⁠
1 tsp grated lemon or orange peel⁠
1/2 tsp ground cloves⁠
1/4 cup honey⁠
1/2 cup melted butter⁠
Instructions⁠
⁠
Boil all fruit except raisins. Drain and set one cup of liquid aside for use in the bread recipe.⁠
Combine sugar, yeast and 1/2 cup warm water and let yeast rise for 10 minutes.⁠
Put all ingredients in a mixer and mix with a dough hook until the dough makes a nice soft ball. You can mix by hand, but it is very difficult dough to work with and don't recommend it for beginners.⁠
Place dough in a greased bowl, cover with a tea towel, and let rise in a warm place until doubled in size. This can range from 1-2 hours depending on the humidity level where you live.⁠
Punch down and shape into loaves. Place in greased bread pans and poke holes in the top with a fork. Let rise for 30 minutes to 1 hour.⁠
Bake at 350 for 40-50 minutes, or 25-30 minutes if you use smaller loaf pans.⁠
Notes⁠
⁠
Rising times vary greatly depending on how much humidity is in the air on baking day. Even though the recipe takes a long time, most of that is spent impatiently waiting for the dough to rise.
Instagram post 2193017018314283996_2204272319 DAY 5: 12 days of Christmas Baking ⁠
⁠
Shortbread is one of my favourite Christmas treats, but whenever I made it I would always mess it up.  The first time I tried to replace the butter with margarine. . . bad idea.  Another time, I chose a three ingredient recipe that was so crumbly it wasn't worth eating.  Then I found this recipe and everything was better!! Until 2 Christmas's ago when I went to Jamaica and decided to make them for my new relatives.  Hot and humid country + different butter= cookies that were a complete disaster.  However, we didn't throw them away and someone served them when everyone came to visit the condo we rented.  I was mortified, but my brother-in-law's family loved them, as they had never experienced North American style baking.⁠
⁠
Moral of the story?  Don't make these in a tropical-weather country.  But even if they flop, they're still really delicious!⁠
⁠
1 cup corn starch,⁠
1 cup icing sugar,⁠
2 cups flour,⁠
1 1/2 cups butter, softened⁠
Instructions⁠
⁠
Mix all ingredients and spoon on to a cookie sheet.⁠
Optional: chill for 30 minutes and roll out for a cut cookie⁠
Apply sprinkles or cherries before baking⁠
Bake at 300 degrees Fahrenheit for 15 to 20 minutes. Cookies should have the barest hint of light brown at the edges. Makes 48 small cookies⁠
⁠
If you want the cookies to look like this, skip the sprinkles and the cherries and bake them plain instead.  Once everything has cooled, dip cookies in melted white chocolate and sprinkles.
Instagram post 2192292281407280453_2204272319 DAY 4:  12 Days of Christmas Baking⁠
⁠
Sometimes, I feel like I am a terrible neighbour.  The Hermit and I rarely get to the communal shovelling of the winter snow for our neighbours first.  There's always some weird garden experiment going on, and it feels like we've been renovating forever.  How do I make up for it?  Fresh tomatoes, jars of jam, the odd bouquet of flowers, and finally, a box of this fudge that magically shows up on their doorstep at Christmas.  I make about 8 batches of the stuff in all different flavour combinations, cut each batch into 8 large chunks, then I package them up in little sampler packs that I give out to said neighbours, Dominic's teachers, Aulaire's babysitters, or whoever I want to give a little Christmas gift to.⁠
⁠
The recipe is super simple and it's fairly idiot-proof.  No crumbly fudge here!⁠
⁠
3 cups semi-sweet chocolate morsels⁠
1 can Eagles Brand Sweetened Condensed Milk or homemade recipe (which I used)⁠
Dash of salt⁠
1.5 tsp vanilla⁠
⁠
Optional toppings/decorations⁠
1/2 c nuts (stir in, or crush and sprinkle on top)⁠
Mini marshmallows⁠
White Chocolate chips to melt and drizzle for decoration⁠
Coconut flakes⁠
⁠
Melt chocolate in a bowl over a water bath. Stir in sweetened condensed milk, salt, and vanilla. Combine until smooth.⁠
⁠
Add any additional optional ingredients you want IN the fudge (nuts, marshmallows). Pour & spread evenly into an 8×8 pan lined with wax or parchment paper. This is a great time to add optional toppers.⁠
⁠
Refrigerate 2 hours, or until set, and then remove from pan & paper and cover tightly with plastic wrap to avoid it drying out. If cutting into several pieces at once (& sometimes mini cookie cutters are nice for this), set it out on the counter for 20 minutes or so to soften enough for neater, easier cuts.
Instagram post 2191567720172943549_2204272319 DAY 3: 12 Days of Christmas Baking⁠
⁠
So today's recipe isn't actually baking that you would put on your tray per se, but it is super crucial to many recipes you might want to make and will save you money.  It's. . . *drumroll please*. . . Homemade sweetened condensed milk!⁠
⁠
Seriously, this stuff is worth the extra effort and it tastes so much better!  You'll want to make a batch for tomorrow's recipe, where I share my no-fail fudge. (Well actually, it's one of reader's no fail fudges, but I feel like it's mine now because it's been my go-to for 3 years!)⁠
⁠
1 cup powdered milk⁠
2/3 c white sugar⁠
1/3 c water⁠
1/4 c butter⁠
⁠
Combine in blender until extremely smooth⁠
⁠
Also, let me know if you make any of this stuff.  I would love to see your pictures of any of your creations during the 12 days of Christmas baking.  Tag me @shifting_roots and I'll be sure to share your baking in my stories.
Instagram post 2190842732075560326_2204272319 DAY 2: 12 Days of Christmas Baking: Rice Krispie Trees⁠
⁠
Back in the day when I baked for almost 200 people over 4 Christmas recitals with 60 students, plus one choir that required some baking too, my goals were this: make things that are pretty, tasty, and kid friendly.  Because what's the point of making all this baking if the kids in my music studio don't eat it?!?⁠
⁠
That's how these Rice Krispie Christmas Trees were born.  They are a tiny bit fussy in the fact that there's melting chocolate and sprinkles, but they make the eater feel like they are getting something really special.. . and they are!⁠
⁠
If you use big enough cookie cutters (you don't have to be limited to just trees) you could even use them as a classroom present for your students, as these should be free of most common food allergens.  Just get the gluten-free Rice Krispies if you have any kids with Celiac.⁠
⁠
Ingredients⁠
⁠
6 cups Rice Krispie cereal,⁠
40 large marshmallows,⁠
1/2 cup butter,⁠
1 tsp vanilla,⁠
1 1/2 cups white chocolate melting wafers⁠
sprinkles⁠
⁠
Instructions⁠
⁠
Melt butter, marshmallows and butter in a large bowl in the microwave for approximately 5 minutes, setting the microwave one minute at a time and stirring in between.⁠
Add Rice Krispies and press into a large cookie sheet. Allow to cool. Cut Christmas tree shapes with cookie cutter.⁠
Melt chocolate wafers and dip in Rice Krispie treats. Add sprinkles if desired. Work fast, as the chocolate dries quickly!
Instagram post 2190118109285570760_2204272319 DAY 1: 12 Days of Christmas Baking⁠
⁠
Let's start off the season with one of my favourite, easy, I-keep-coming-back-for-more-even-though-I-probably-shouldn't Christmas treats--Almond Roca.  You may also know it as Christmas Crack, or in our family, "that thing that Auntie Sandy makes."⁠
⁠
Whatever you call it, make sure you make an extra batch, because there won't be leftovers!⁠
⁠
Ingredients⁠
⁠
1 sleeve soda crackers (2 for a large cookie sheet)⁠
1 cup butter,⁠
1 cup brown sugar,⁠
3/4 cup slivered almonds,⁠
1/2 cup milk chocolate chips, melted,⁠
1/2 cup white chocolate chips, melted.⁠
⁠
Instructions⁠
⁠
Line cookie sheet with tinfoil. Spray with Pam.⁠
Layer crackers.⁠
Bring butter and brown sugar to a boil for 2 minutes, stirring often.⁠
Pour over crackers and bake in a 325 oven for 10 minutes. Turn off oven. Sprinkle with almonds and return to the oven for 5 minutes.⁠
Cool. Drizzle melted milk & white chocolate chips, alternating colours.⁠
Cut in squares and serve.⁠
Load More… Follow on Instagram

Theme Design By Studio Mommy · Copyright © 2019